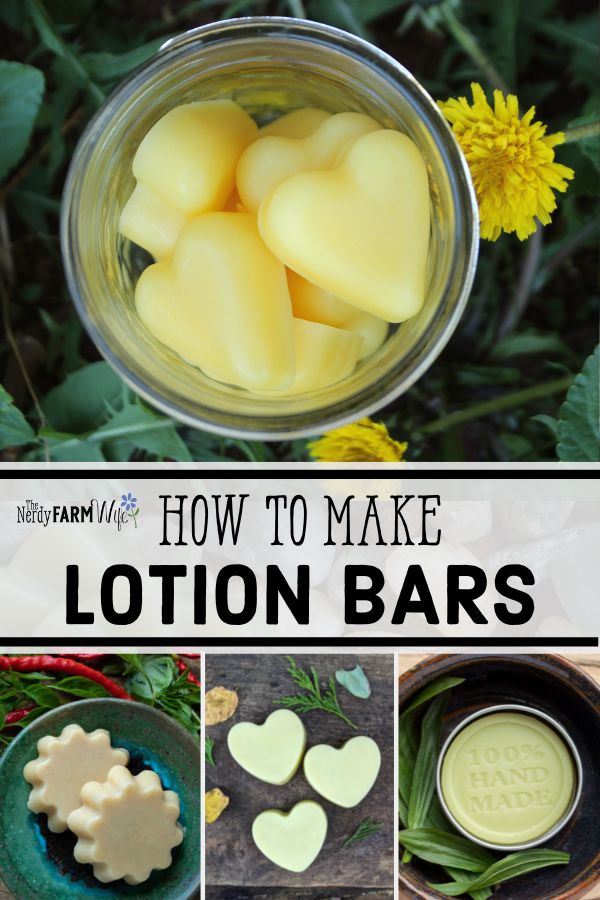
How to Make Lotion Bars: Recipes, Tips & Tricks
Learn how easy it is to make your own homemade lotion bars! They’re so simple to make – if you can melt chocolate or candy melts, you can 100% make a lotion bar.
I’ll share a basic lotion bar formula, tips on how to adjust ingredients so your bars won’t feel too greasy, some essential oil and herbal infusion ideas to customize them, plus ten of my favorite recipes to get you started.
First, what exactly is a lotion bar?
Lotion bars are sometimes called solid salves or hard lotion. They’re similar to using chapstick or lip balm, only instead of using them only on your lips, you can rub lotion bars on your hands, feet, knees, or other parts of your body. The heat from your warm skin melts the lotion bar just enough to leave a light layer of oils and butters behind.
It’s helpful to use lotion bars after a bath, shower, or washing your hands, so that the oils and butters can help seal in the hydrating goodness of the water. However, they’re also good for spot treating really dry, itchy, and bothersome spots that pop up during the day.
What ingredients do you need?
Lotion bars are usually made with roughly equal parts of:
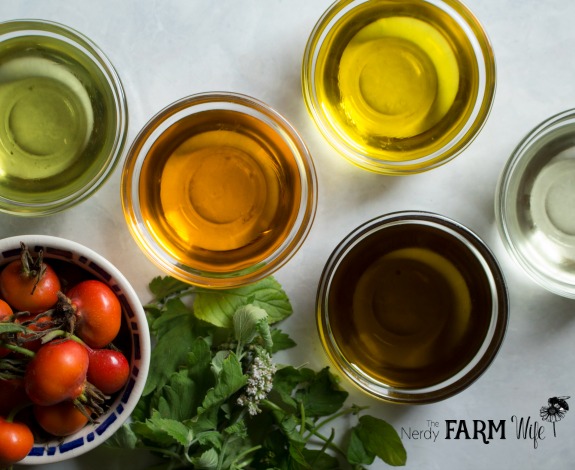
- carrier oil – such as sunflower, jojoba, grapeseed, olive oil, etc
- cosmetic butter – such as shea butter, mango butter, cocoa butter
- wax – beeswax is traditionally used, but you can use candelilla wax as a vegan alternative
Optionally, you can also add: essential oils for scent or skin benefits, various herbs infused into the oils, and/or a couple of natural colorant and additive options.
My favorite place to buy high quality, organic ingredients is Mountain Rose Herbs, or you can check with your local health store or favorite vendor.
Some crafters use equal parts of oil + butter + wax by weight, while others use equal parts by volume (measuring cups). I personally use equal parts by volume, but you can experiment with both ways.
The great thing about lotions bars is if they turn out too soft, you can just remelt them and add more wax. If they’re too hard, you can remelt them and add more oil.
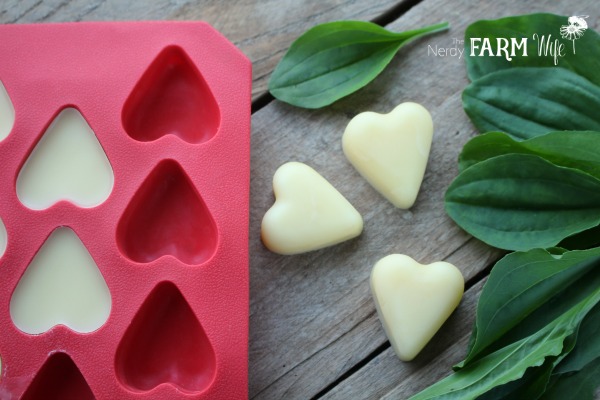
To make lotion bars, all you do is melt those three ingredients together and pour them into molds. Your local grocery or big box stores is a good source for seasonal silicone molds (normally used for things like muffins or candy) – I especially love the heart shaped ones found around Valentine’s Day!
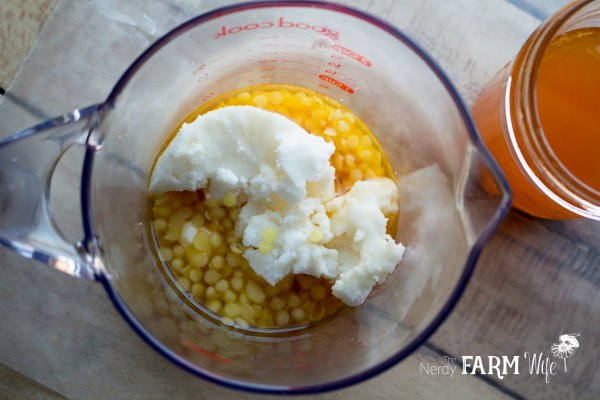
Basic Lotion Bar Formula
The very basic formula I use when creating new lotion bar recipes is:
- 1/4 cup (abt 52 grams) carrier oil
- 1/4 cup (abt 44 grams) cosmetic butter
- 1/4 cup (abt 28 grams) beeswax*
(*For a vegan option, use 1/8 cup candelilla wax instead.)
- Combine all of the ingredients in a heat proof mason jar or container. (Alternatively, an empty soup can works too, and makes cleanup easy.)
- Place the container into a small sauce pot containing a few inches of water, enough water to go up the sides of the jar, but not so much that the jar floats. (This makes a DIY double boiler.)
- Place the pan over medium heat until the wax and everything melts together.
- Remove from heat, stir in additives, and pour into molds.
- Cool and store in tins or jars.
Before making, I decide whether I’m going to use an herb-infused oil (which I almost always do), what type of oils and butter I’m going to use, whether I want to add essential oil or colorant, and so forth.
Kokum or cocoa butter are hard and brittle, so you will probably need a little under 1/4 cup of those than if you used a softer butter like mango or shea.
Once that’s all sorted, I make a test batch and see how they turn out! If I don’t quite like the result, I adjust the ingredients and make another test batch. This goes on until I’ve perfected my new recipe.
RELATED ARTICLE: How to Make Herbal Infused Oils (+FAQS & Tips)
Shelf Life of Lotion Bars
Lotion bars have a fairly long shelf life of at least 9 months to 1 year, but more often even longer than that. As long as they smell good, they are good to use. If they start smelling like rancid oil, then you know it’s time to throw them out and start a new batch.
Because they are completely oil based, you don’t need to add a preservative to lotion bars.
Tips & Tricks for Making Lotion Bars
Here’s some useful information to know when making a recipe you found online or in a book, or when creating your own lotion bar recipe from scratch.
Volume to Weight Equivalents
Do you want to try out a lotion bar recipe that only lists ingredients by weight, but you don’t have a scale? These measurements may be helpful!
Remember that these are rough equivalents though, so if your lotion bars turn out harder or softer than expected, you can melt them down again to fix the texture by adding more oil or wax.
Make notes in your recipes to help you remember these small adjustments for the next time you make that recipe!
- 1 tbsp beeswax pastilles, loosely heaped = about 7 grams
- 1 tbsp beeswax, tightly packed = about 13 grams
- 1 tbsp candelilla wax = about 7 grams
- 1 tbsp oil = about 12 to 13 grams
- 1 tbsp shea or mango butter = about 12 to 14 grams
How do I keep my lotion bars from feeling too greasy?
You have two approaches.
Method 1: Change the Oils in the Recipe
The first one, and my favorite way, is to adjust your recipe from the start.
Some oils feel very heavy on your skin and take a long time to soak in. If you use a lot of these types of oils in your recipe, your lotion bar will also feel heavy and oily. For those with ultra dry skin, this is a good thing! You probably want an oilier feeling bar.
However, if you include some oils that rapidly soak into your skin, your lotion bar will feel lighter and less greasy, which may be more pleasant for some people to use, especially on their hands. Of course, any lotion bar will still feel somewhat oily, because that’s the nature of an oil and wax based product.
You can control the feel of your lotion bar, by controlling which oils you add to your recipe.
Oils that soak into your skin fast and feel lighter on your skin include:
- Fractionated coconut oil (Caprylic/Capric Triglyceride) – This is my favorite ingredient to add to lotion bars, to help lighten up their overall feel. Don’t use it as 100% of the oil though, but more like 10 to 20% of the total oil amount. Fractionated coconut oil is the type that stays liquid even when it gets cold. Don’t confuse it with regular coconut oil, which is heavy and absorbs more slowly.
- Jojoba oil (Simmondsia chinensis) – Actually a liquid wax, jojoba is good for all skin types.
- Grapeseed oil (Vitis vinifera) – Very light and non-oily, helps soothe redness and inflammation.
- Argan oil (Argania spinosa) – A luxury oil that’s useful for all skin types; may offer some anti-aging benefits.
- Rice bran oil (Oryza sativa) – Inexpensive and lighter alternative to olive oil.
- Apricot kernel oil (Prunus armeniaca) – Has a light feel and pleasant scent, very nice for all skin types, but especially dry, aged skin.
Oils that feel heavier and take a longer time to absorb:
- Olive oil (Olea europaea) – While it’s a traditional choice for salves, creams, and lotion bars, it’s actually a pretty heavy feeling oil, so I recommend combining it with a small amount of a lighter oil listed above to improve the feel.
- Sunflower oil (Helianthus annuus) – This is my top choice for those with broken or dry skin. Combines well with rice bran or apricot kernel if you have extra dry skin.
- Avocado oil (Persea gratissima) – Good for eczema and damaged skin, combines well with grapeseed, or any of the lighter oils above.
- Tamanu oil (Calophyllum inophyllum) – A beautiful deep green oil that’s used in small amounts (about 10 to 20% of the total oils) to help with eczema, psoriasis, and damaged skin.
- Coconut oil (Cocos nucifera) – Regular coconut oil (the kind that gets solid below 76 degrees F) is heavy and slower to absorb into your skin. It’s also associated with redness or flaky skin in some people, so it’s not one of my favorite oils to use in skin care unless I know for sure the person I’m making lotion bars for does well with it.
Some all-purpose oils that are a nice medium weight include:
- Sweet almond oil (Prunus amygdalus dulcis) – Rich in fatty acids and good for all skin types, but avoid for someone with nut allergies.
- Kukui nut oil (Aleurites moluccana) – A lovely oil that’s good for chapped, red, or irritated skin.
- Pumpkin seed oil (Cucurbita pepo) – Rich in essential fatty acids, moisturizing.
Method 2: Add Starch
The second way to help a lotion bar that feels too greasy is to add in a small amount of tapioca starch, arrowroot, or cornstarch.
Try stirring 1/4 teaspoon of one of those starches into the melted lotion bar mixture if using the 1/4 cup + 1/4 cup + 1/4 cup formula from above. Stir really well to avoid clumps in the finished product.
It’s better to design your recipe so you don’t need the starch, but it can be used in a pinch if needed.
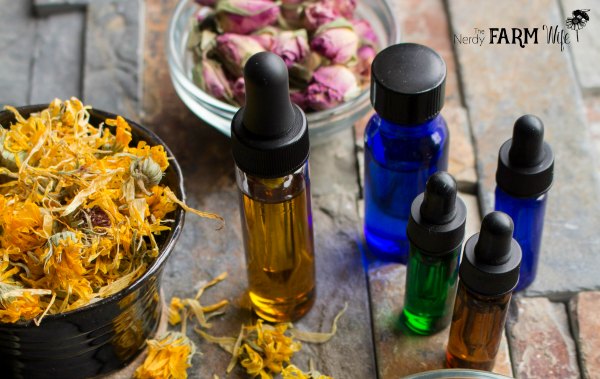
Essential Oil Suggestions & Amounts
Want to safely add essential oils to your lotion bars? I’ve got you covered!
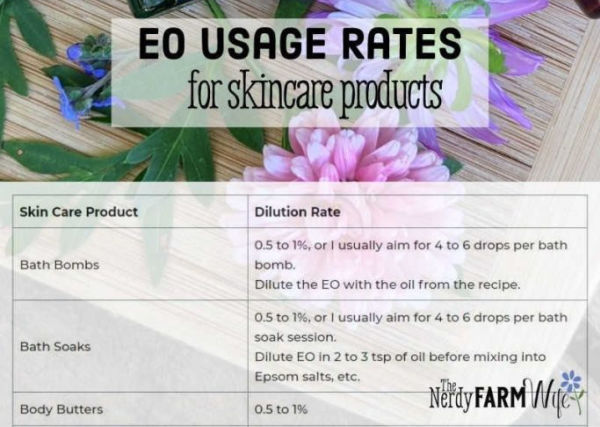
How Much Essential Oil to Use:
For standard lotion bars, I suggest starting with a 0.5 to 1% essential oil usage rate, though you can certainly use more for spot treating aches and pains (3 to 4%).
| Amount of Product | 0.5% | 1% | 2% | 3% | 4% |
| 0.5 oz (15 ml) | 1 drop | 3 drops | 6 drops | 9 drops | 12 drops |
| 1 oz (30 ml) | 3 drops | 6 drops | 12 drops | 18 drops | 24 drops |
| 2 oz (60 ml) | 6 drops | 12 drops | 24 drops | 36 drops | 48 drops |
| 3 oz (90 ml) | 9 drops | 18 drops | 36 drops | 54 drops | 72 drops |
| 4 oz (120 ml) | 12 drops | 24 drops | 48 drops | 72 drops | 96 drops |
| 6 oz (180 ml) | 18 drops | 36 drops | 72 drops | 108 drops | 144 drops |
| 7 oz (210 ml) | 21 drops | 42 drops | 84 drops | 126 drops | 168 drops |
| 8 oz (240 ml) | 1/4 tsp | 1/2 tsp | 1 tsp | 1 1/2 tsp | 2 tsp |
Here’s an example of how to use that data with the formula I gave above:
- If your recipe has 1/4 cup oil + 1/4 cup butter + 1/4 cup wax, that’s equal to 3/4 cup.
- 3/4 cup is the same as 6 ounces.
- So if you want a 1% usage rate for 6 ounces of melted lotion bar mixture, you would look at the chart above and add 36 drops of essential oil.
RELATED: I also have an entire article written up about how much essential oil to use in various skincare products:
Essential Oil Dilution Chart + Amounts to Use in Skin Care
What about calculating by weight?
If you’ve weighed your lotion bar ingredients, just total up the weight of everything in your recipe/formula and multiply it by the recommended dilution rate percentage.
For example, let’s say you have a lotion bar recipe whose total ingredient weights add up to 106 grams (3.75 oz) and you want to use a 1% usage rate.
Take 106 grams x 0.01 (another way to write 1%), which equals: 1.06 gram. For ease of use, we’re going to round this down to 1 gram, so you will use 1 gram TOTAL of essential oil in your 106 gram lotion bar recipe.
Some Essential Oil Suggestions
Here are a few essential oils to consider adding to your DIY lotion bars:
- Bergamot (Citrus bergamia) – a lovely citrus aroma with a hint of floral; look for bergapten-free types since regular bergamot oil can make you overly sun-sensitive
- Cedarwood (Cedrus deodara) – adds a soft, pleasing woodsy scent. I previously recommended Cedarwood Atlas, but since learned about its endangered status, so now recommend Cedarwood Himalayan instead.
- Cypress (Cupressus sempervirens) – has a clean evergreen scent and is useful in lotion bars made for aches, pains, or warming purposes
- Grapefruit (Citrus x paradise) – has an energizing and uplifting scent, it must be well diluted in daytime products, under 4%, to avoid sun sensitivity
- Lavender (Lavandula angustifolia) – a classic calming floral that soothes both your skin and senses
- Peppermint (Mentha × piperita) – energizing, cooling, and refreshing, it blends really nicely with the smell of unrefined cocoa butter to make cocoa mint bars
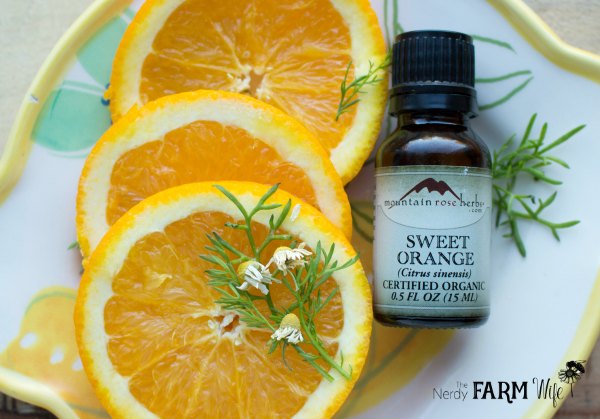
- Sweet Orange (Citrus sinensis) – a zesty and fresh citrus scent that is safe to use in daytime products

How to Add Natural Color to Lotion Bars
Try adding 1/2 teaspoon of French green clay or rose kaolin clay to your lotion bars for a soft color. Be sure to keep the amount of the low side, since too much clay can feel drying on your skin.
Another idea is to add a few drops of sea buckthorn oil at a time for a pretty natural yellow colorant. Don’t use too much or it can stain your skin!
As mentioned above, tamanu oil also adds a pretty green color to lotions bars (and DIY salves & homemade lip balms!)
A pinch of turmeric can be added, as shown in this recipe for Soothing Sunshine Lotion Bars.
Here’s a video of me making a batch of dandelion lotion bars!
(Sometimes an ad plays first, but the video will play right after! If you have an adblocker, the video might not be visible.)

10 Homemade Lotion Bar Recipes for Inspiration
Here are several of the hard lotion bar recipes that you can find on my website. Feel free to use the tips in this article to tweak the recipes and make them your own!
- Dandelion Lotion Bars – One of the very first lotion bars I ever made. I designed them for my husband who was a rock mason at the time – his hands would get so cracked and dried out that they would bleed. It’s also one of the oldest recipes on my site, but still one of the most popular and well-loved!
- Purple Dead Nettle Lotion Bars – This recipe takes advantage of a prolific springtime weed that you most likely have to pull each year to make room for your garden veggies!
- Warm Toes Lotion Bars – For this recipe, I added a warming kitchen herbs – ginger and cayenne – so the lotion bar not only moisturizes dry feet, but it can help warm up cold toes too! Perfect for winter time months, or if you always keep cold feet.
- Green Gold Lotion Bars – These feature tamanu oil – which is an amazingly effective oil for all sorts of skin woes, including damaged, cracked skin. It also gives the bars a pretty green hue.
- Spicy Arnica Lotion Bars – A featured recipe from my ebook, Things to Make for Aches & Pains. They’re good for arthritic hands and aching joints.
- Lotion Bar Sticks for Pain Relief – You can also pour your lotion bars into tubes and make “lotion bar sticks”. Some people like these for convenient spot application, without getting ingredients on your fingers.
- Soothing Sunshine Lotion Bars – Featuring sunny flowers and a tiny bit of turmeric powder to make a pretty yellow lotion bar that’s great at soothing dry skin!
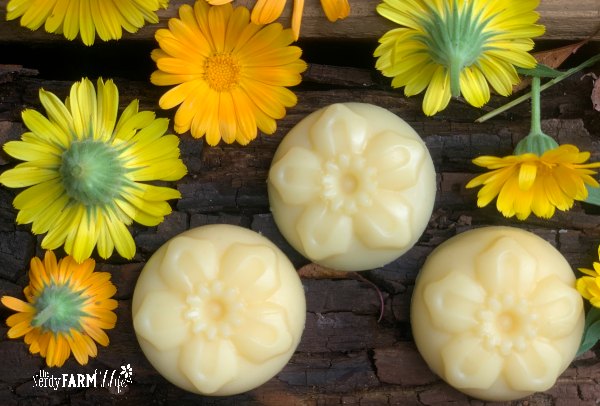
- Calendula Lotion Bars – An absolute classic, calendula is a preferred herb for damaged skin. Calendula is also safe enough that it’s used in skin care products for babies and for pets.
- Herbal Intensive Lotion Bars – These heavy duty bars are really helpful for those who work outside a lot with their hands, such as landscapers, construction workers, and farmers.
- Rock Climber’s Lotion Bars – Here’s an example of a lotion bar made differently than a traditional lotion bar. The butter is left out, so that the callouses can remain, protecting the climber (or cross-fitter, ninja warrior, etc) from tearing their skin each time they climb or actively use their hands.


Could ground turmeric be used for coloring as well? I know working with fresh turmeric, it stains my hands yellow.
thanks!
Jane
My apologies – I obviously had not read through your list of Recipes for Inspiration when I first commented. Your Soothing Sunshine Lotion Bar includes turmeric.
Thanks!
Jane
Hi Jane, Thank you so much for reminding me about turmeric! You’re exactly right – it can stain, so you have to keep the amount really low. Just a tiny pinch, enough to add a hint of golden color. :) I’ll be sure to add that into the article this morning. Thanks again!!
Thank-you so much for this information!
Hi Mary! I’m so happy that you enjoyed the article! :)
Hi Jan, Thanks for the great article. I’m excited to make these. Do you have a recommendation on what temperature to store the lotion bars after they are made? Thinking of giving some to friends and just want to make sure I give them proper use & storage instructions.
Thank you!
Hi Ash! We keep ours at room temperature. Unless you live in a really hot climate, whatever room temperature is comfortable for you, is perfect for your lotion bar! :)
I have an older relative who worked in a farm store and he carried one (in a tin) around in his pocket to use while he worked & it still stayed in great shape.
I would mention not to store in their car though, or it could get melty on a really hot summer day.
Ok, perfect, thank you!! :)
Thanks Jan for these great tips oh how to make lotion bars not greasy I made a batch yesterday for my father in law who Loves them for his dry split hands. The last few batches I made were so greasy so I added a pinch of cornstarch and I used calendula infused sunflower oil this time and they’re perfect
Thank you
Hi Nicole, I’m so happy to hear that the lotion bar tips helped! :)
So I just made a go at my first batch: they turned out rather soft and I think it is because I am using soy wax. Should I increase the soy wax since it is a softer wax than bees wax ? Also do you have suggestions for making one to help with bug repelling ? I was thinking I could add essential oils that bugs aren’t fond of but advice is welcome. I have children that will not tolerate traditional bug spray and mosquitoes are eating us alive here in the south !
Hi Audrey! If your lotion bars turn out too soft, you can definitely melt them up again and add more wax and possibly more butter (if you used a hard butter, such as cocoa or kokum).
I make a tick repelling salve that might be adaptable for lotion bars:
– 3.5 oz (99 g) sunflower,rice bran or other oil
– 0.5 oz (14 g) beeswax
– 2.3 g essential oils: 1.1 g geranium, 0.7 g Virginia cedarwood, 0.5 g lavender
(Note that I also use insect repelling socks/scarves, etc – and layer on more than one tick protection after having 2 bouts of Lyme disease over the years!)
but for mosquitoes, I would check out Robert Tisserand’s blend suggestions:
https://tisserandinstitute.org/learn-more/mosquito-repellents/
and incorporate some of those ideas in.
Good luck with your lotion bar experiments! :)
Very informative, thank you so much.
Hello
I was wondering could I use a dehydrated Goat’s Milk Powder? If so how much would you recommend using?
Also do lotion bars need arrowroot? Thank you xx
Hi Sarah! I think that the milk powder would probably feel gritty on your skin, since it dissolves in water, but lotion bars don’t contain any liquids.
However, I haven’t tried it myself to be certain, and you could try a tiny test batch and see how it goes!
You don’t have to add arrowroot to lotion bars, but you can add a small amount if you’d like.
If a bar feels greasy, then it’s better to first try to adjust the oil types & aim for a lighter, more absorbent oil.
Lotion bars will still feel naturally on the oily side, because they’re mainly oil and butter based, but you can make them less-greasy with formulation. :)
Could white clay be added to lotion bars?
Hi Nicole! Yes, you could add a small amount, though clay can feel a bit drying on your skin so I usually only add it as a natural colorant. I’d make a small test batch & see how you like the feel! :)
I would really like to make a lotion bar that incorporates magnesium. I have some magnesium cream but hate getting it on my fingers so I thought a solid lotion bar in a tube would be perfect. However I’m learning that Magniseum oil is made with water, therefore I’m assuming that the recipe would have to incorporate an emulsifier and a preservative. Can a lotion bar have those additions without changing the feel of the lotion bars? What kind of ratios would I be looking at?
Hi Ginger, That’s such a great question! I’ve thought about this as well, but haven’t experimented further with this idea yet.
I agree with you that it seems that the magnesium oil would need to be emulsified so it won’t ooze out,
though I see that Lush has some solid bar magnesium products – even including witch hazel & water! – and no apparent emulsifier at first look:
https://www.lush.com/us/en_us/p/after-massage-bar/65g
So I think there is a way, but I haven’t experimented yet to figure out a recipe. (Though I will almost certainly use an emulsifier & a natural preservative when I do.) :)