DIY Lavender Bath Bombs {100% Natural}
These relaxing DIY lavender bath bombs get their pretty natural color from purple Brazilian clay and delightful scent from pure lavender essential oil.

The shea (or mango) butter helps to hold the bath bomb together, without the need for a lot of added witch hazel.
If shea or mango butter isn’t available, a mixture of 1/2 oz cocoa butter plus 1/2 oz of your favorite oil could work equally well.
How to Make 100% Natural Lavender Bath Bombs
Ingredients You’ll Need:
- 1 3/4 cup (500 g) baking soda
- 1 cup (236 g) non GMO citric acid
- 1/2 tsp purple Brazilian clay
- 1 oz (28 g) shea or mango butter, melted
- 20 drops lavender essential oil
- dried lavender buds, optional
- witch hazel in a small spray bottle
Yield: around 5 medium bath bombs
Characteristics: Steady gentle fizz, long lasting
How to Make Lavender Bath Bombs:
- Stir the baking soda, citric acid and purple clay together, working out any clumps with your fingers or the mixing spoon, as needed.
- Combine the melted shea or mango butter with the lavender essential oil.
- Slowly drizzle the melted butter and essential oil mixture into the combined dry ingredients, while stirring.
- Break up any remaining clumps with your hands to make sure the butter is thoroughly incorporated.
- Try squeezing a portion of the mixture into a ball shape. If it holds together nicely, the mixture is ready.
- If it crumbles, spray 1 to 2 spritzes of witch hazel into the mixture, while stirring and then check again.
- Add another spritz or two if needed.
- Once the mixture holds together in a ball without easily crumbling, you’re ready to press into molds.
- If you’d like lavender buds on top of your bath bomb, sprinkle a few in the bottom of one half of the bath bomb mold.
- Overfill both halves of the bath bomb mold with the mixture, pressing lightly as you pack it in.
- Press the two halves together, cleaning out any extra bits that squeeze out from the edges with your fingers.
- Tap the filled mold lightly on your work surface a few times, then flip over and tap again.
- Carefully try pulling the top half of the mold off.
- Keep the bath bomb in the bottom half of the mold for about 15 minutes before removing that side.
- If the two sides don’t want to stick together, try scooping the mixture back out of the mold and stir in one to two more spritzes of witch hazel before trying again.
- You may have to spritz the mixture with more witch hazel between each bath bomb, to keep it workable.
- After removing the bath bomb from the bottom half of the mold, carefully place it on a folded towel or other soft surface and allow to air dry for 24 hours before packaging.
Store bath bombs in a dry place and use within 4 to 6 months for best results.
Be careful exiting the tub after using a bath bomb as the tub floor may be slippery from the butter.
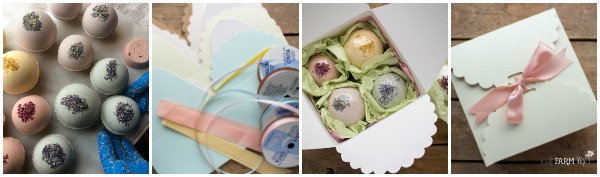
Packaging Bath Bombs
Now that you’ve made your beautiful bath bombs, check out my article on How to Package Bath Bombs for Gift Giving.
It also includes a video tutorial for making pretty round labels for your bath bombs!


They sound lovely :)
Thanks Liz! I’m glad you like the recipe!
These are beautiful without a lot of chemicals. I love but they don’t like me. Where did you get the molds or did I just miss that section?
Hi LeShia, Thanks for asking! I completely forgot to put those links. I need to add those in – thanks for letting me know! :)
I look for stainless steel bath bombs on Amazon – here’s one link I found that I’ve purchased a few sets of & had good results: http://amzn.to/2tWqExe
Hi, you have great video of making bombs. I am from people, who do not like videos, prefer to read, but yours are inspirating, good (short) lenght and completely working for me
Hi Krisi! So happy you like the video! I like short and to-the-point videos myself, so I’m glad to hear that others feel the same way! :)