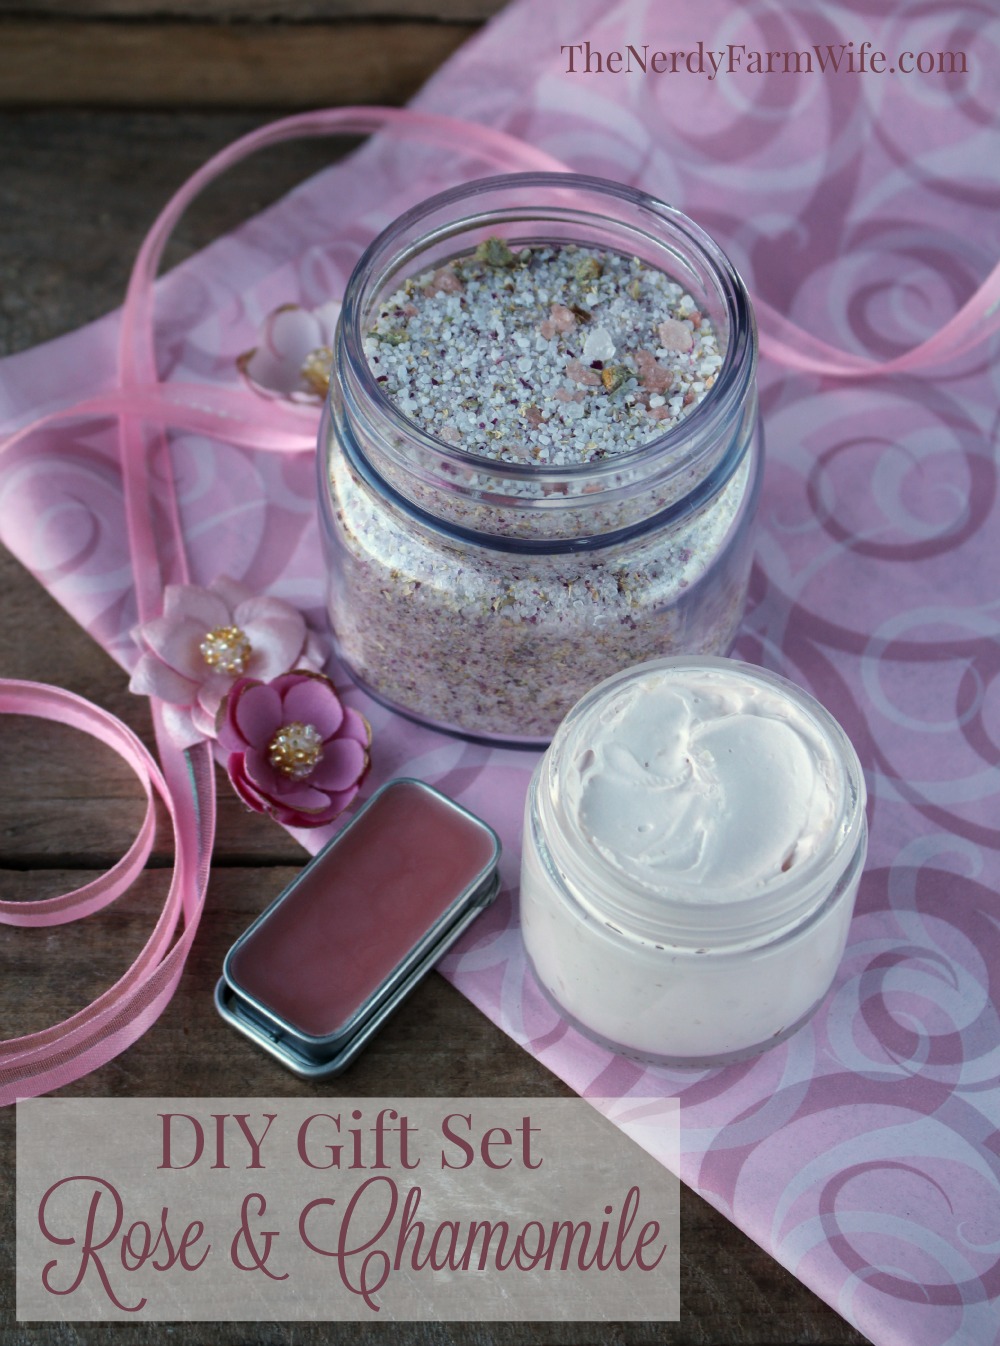
Rose & Chamomile Gift Set
This DIY Rose & Chamomile Gift Set would make the perfect handmade gift for the rose-lover in your life!
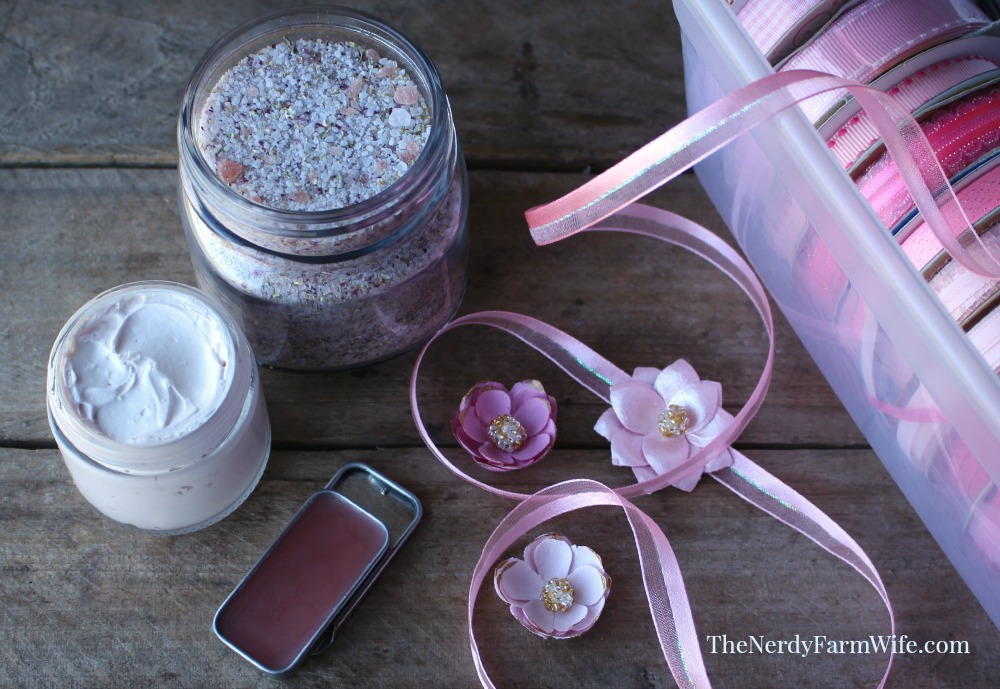
It’s made up of:
- Rose & Chamomile Bath Salts
- Whipped Rose & Chamomile Hand Cream
- Rose & Chamomile Lip Balm
The steps listed below are given in the most efficient order so that all three projects should only take a couple of hours to make, from start to finish!
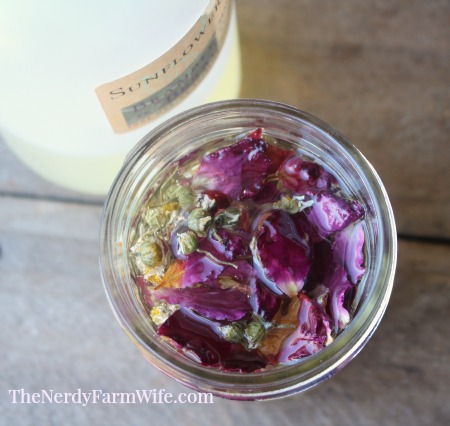
Step 1: Make an infused oil.
Place a generous pinch each of dried rose petals and chamomile flowers in a half-pint (8 oz) canning jar or other heatproof container. (The flowers should roughly fill the jar half-way.)
Pour oil over the dried flowers until it reaches close to the top.
I used sunflower oil, but you can use other types if you wish, such as sweet almond, avocado, hemp, rice bran and so forth.
Set the uncovered jar of oil down into a saucepan containing an inch or two of water, forming a makeshift double boiler.
Place the pan over a low burner for one to two hours (or longer) in order to allow the heat to infuse the properties of the flowers into the oil.

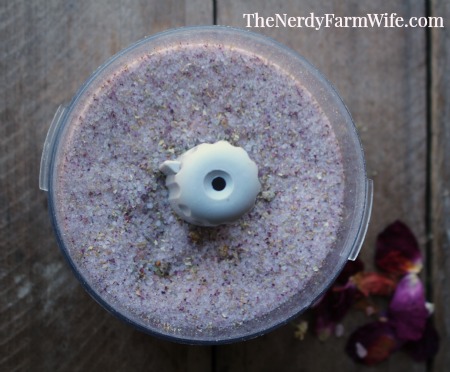
Step 2: While the oil is infusing, make the bath salts.
Ingredients needed:
- 2/3 cup Epsom (and/or other types) salt
- 1/3 cup dried rose petals
- 1/3 cup chamomile flowers
Yield:
This amount fits perfectly in a half-pint (8 oz) jar.
Directions:
For the bath salts shown in this post, I used mostly Epsom salts (from my local grocery store) with a tablespoon or two of pink Himalayan salt mixed in for color and added trace nutrients.
I don’t usually add essential oil, since the salts will already have a scent from the flower petals, but you can add a few drops of rose absolute or geranium essential oil, if you’d like, diluted with 1/2 teaspoon of oil.
Blend the flowers and salt(s) together until finely ground. (I LOVE my mini food processor for this task – mine is 16+ years and still going strong!)
They’ll look something like this when fully blended:
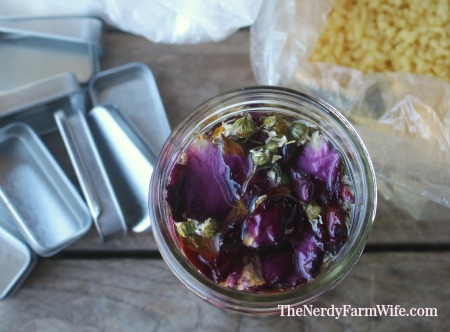
Step 3: Make the lip balm.
Ingredients needed:
- 3.5 tbsp (35 g) rose and chamomile infused oil
- 0.5 tbsp (5 g) castor oil
- 1 tbsp (14 g) shea butter
- 1 tbsp (10 g) beeswax pastilles (or grated, pressed tightly in the spoon)
- pinch of alkanet root (for color)
- optional lip-safe essential oil, if desired
Yield:
Fills about 7 or 8 lip balm slider tins.
Directions:
Melt the oils, shea butter, beeswax and alkanet root together in a heatproof jar (or upcycled tin can for easy cleanup).
Once completely melted, remove from heat and let cool a few minutes.
Add a few drops of essential oil, if desired. Good choices for lip balm include peppermint, spearmint, or sweet orange.
Pour into slider tins or small round half-ounce tins.
Variation:
If you want to make this recipe in lip balm tubes instead of tins, decrease the oil by around 1 tablespoon so it won’t be too soft when pressed on your lips.
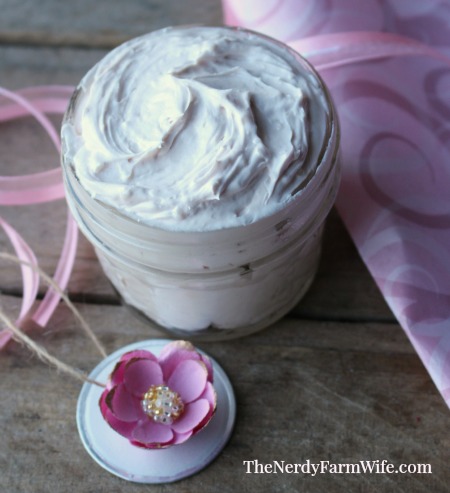
Step 4: Make the hand cream.
This whipped hand cream recipe is based off of the fantastic one created by The Soap Queen!
For this version, you’ll need:
- 7 oz (198 g) avocado (or shea) butter
- 2 oz (60 ml) rose and chamomile sunflower infused oil
- 1/2 oz (15 ml) rosehip seed oil
- a few drops of rose absolute and geranium essential oil, for scent
- 2 teaspoons tapioca (or arrowroot) starch
- 1/2 teaspoon rose clay (optional, for a soft pink color)
Yield:
This recipe fills about 7 two-ounce jars or around 3 four-ounce jars, depending on how much air you beat into your hand cream.
Directions to make:
Place the avocado (or shea) butter in a mixing bowl. Beat several minutes, until light and fluffy. Add the infused oil, rosehip seed oil, tapioca starch, rose clay and essential oils.
The rose clay adds a pale pink tint to the body butter; you can leave it out or replace it with a bit of alkanet root infused oil, if you’d like.
Resume mixing, starting on low then gradually increasing speed.
Beat until the body butter is light and fluffy and the texture of buttercream frosting.
Spoon into jars and cap tightly.
Step 5: Assemble, label, wrap and give to someone you love!


Good morning, lovely post-I shared on pinterest and facebook. Congratulations on your new book release!! Always enjoy your recipes-Merry Christmas
Thank you Kathy! I’m so glad that you liked it and I really appreciate you sharing on Pinterest and Facebook! I hope you have a Merry Christmas as well! :)
Nerdy wife I love the things you come up with to make…can’t wait to try this thank you so very much !! :)
Thank you so much Karen! I’m happy you like it! :)
I love this set of recipes – the colors and scents are so lovely together. I wish I had found it earlier because I don’t have all the ingredients on hand and our gift-giving gathering is tomorrow. But I will save it and try them out soon. If I can make mine as pretty as these, I’ll be making them for future gifts and possibly products to sell at my farmer’s market booth (with credits to your recipes and ideas, if that’s alright?).
Hi Madison, I’m glad you like the recipes! You can certainly use any recipe on the site to make and sell. I don’t mind one bit – that’s what they’re there for! :) Thanks so much for checking out my book too!
P.S. Heading over to Amazon to take a look at your book and pre-order if that’s an option!
I love the scents you’ve combined here. One question: are there options to shea and/or avocado oil for people with latex allergies?
Hi Sherri! Can you use mango butter? Some types are soft enough to whip up with this recipe. If not, let me know and I’ll do some digging around to see what another good substitute idea is. I know how tough it is to have allergies, so would love to find an option that will work for you!
I believe that mango is in the same family. 9 out of 10 people with latex allergies may not react to avocado or shea, but for the one person who does, it can be devastating. A banana put my husband in the emergency room. I only recently learned about shea butter. I appreciate your willingness to research the idea. Not knowing the exact property of shea and avocado that makes them a good component makes it difficult to research myself. Thank you.
This sounds absolutely lovely and I can’t wait to make these for Valentine’s and beyond!
Thank you Beth! :)
Quick question – for the bath salts, are you putting them in a bath tea bag to use or just putting them in the water straight?
Just wondering about flower bits being stuck to your body.
I imagine this smells lovely.
Hi DavetteB! I like to put them in a bath tea bag or even tie them up in a white sock. It definitely makes cleaning the tub easier!
Love is not a strong enough word. I will be making all of these but I have a question, does the lotion or the scrub need a preservative?
Hi Annie, So happy that you like the recipes! The cream is all butter/beeswax based and won’t need a preservative. The salts make about 2 bath’s worth, so they will be just fine as long as they stay dry between use.
Thank you Jan. Preservatives are very confusing When to use and what to use.
Hi there! I was wondering how do you use the bath salts with flower particles? Do you use a muslin bag? Thanks!
Hi Phoenix! Yes, I usually tuck the salts in a muslin bag (or for our own use, in a pinch tie them up in a clean white sock.)
I loved the salts and I did use a muslin bag! I was wondering if it’s necessary to add a preservative to the lotion such as Leucidal Liquid SF, or if it’s ok to skip it because there is not water or hydrosol in the recipe? Thank you!
Hi Phoenix! I’m glad you liked the salts! The muslin bag definitely helps keep them neater. You’re exactly right too – you don’t have to add a preservative, since there’s nothing water-based in the recipe.
Hi, your recipe is so easy. I’ve always melted my butters and hardened in the fridge before whipping. Yours sound so much easier and faster. Are the results the same? Why do some recipes say to melt butters in double boiler?
Hi Lazydandelion (Love your name, by the way!) – This recipe works wonderfully if you have a soft butter to start with. If your butter is hard, like cocoa or kokum, then melting it allows you to add oils that help soften and make the butter more whippable when cooled again. I’ve gotten some batches of mango butter that were really soft and whipped well without melting, while other batches are in hard chunks. So, it’s a good idea to pinch at your butter first and make sure it’s not a solid block.
If it’s hard, then melting and adding oil is the way to go!
If it’s on the soft side, then whipping it without melting is SO much easier and quicker.
I actually prefer to make body butter made this way, versus the melting/cooling/whipping way, though they do end up rather similar by the end.