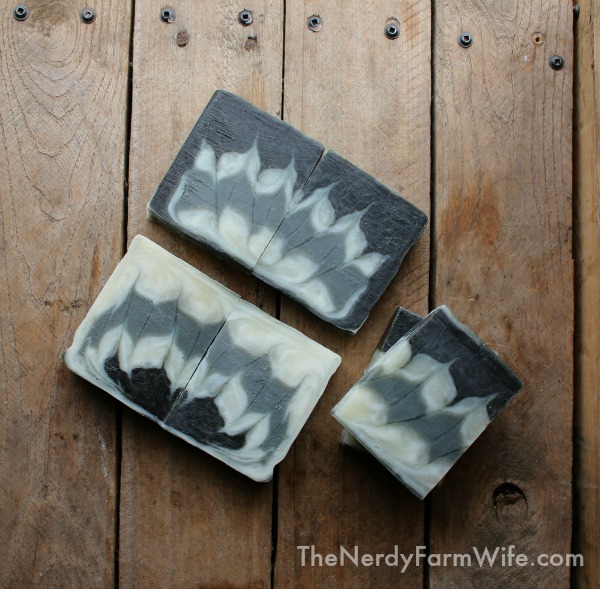
Activated Charcoal Soap (Circling Taiwan Swirl)
Have you heard of the Soap Challenge Club?
It’s a monthly challenge that you can join to learn new techniques and have fun with your soap making. (Plus, you can win some pretty great prizes!)
I’ve been following Amy Warden’s Great Cakes Soapworks blog for a few months now and loved seeing how everyone interpreted the challenge in their own creative ways, and finally couldn’t resist joining in myself.
This month’s project was the Circling Taiwan Swirl.
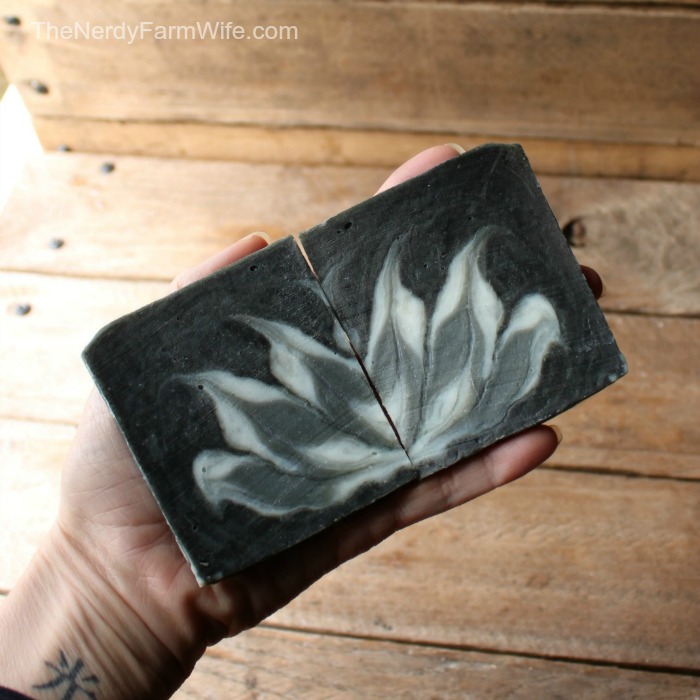
The technique involves using dividers to pour stripes of soap batter and then swirling them so when you cut the bars, you find a variety of designs inside, most notably a lotus blossom design created by the bars on each end of the loaf.
I’ll admit juggling my homemade cardboard dividers was a little harrowing at one point, but I had so much fun with this challenge, that I ended up making a few different batches using this method!
While I’m going to share a couple of process pictures and my recipe used for this activated charcoal version, I didn’t document every single aspect, so to get the full step-by-step details check out Elaine Wright’s video on making the soap (HERE) and her video on cutting the soap (HERE).
New to making soap? Check out my Handmade Natural Soaps eBook Collection. It contains:
- Handmade Natural Soaps eBook
- Natural Facial Soaps eBook
- All-Natural Milk Soaps eBook
- DIY Specialty Soaps eBook
- Essential Oils In Soapmaking eBook
- Quick Guide to Troubleshooting eBook
- Printable Soap Additives Chart
- Printable Essential Oils for Soapmaking Chart
- Soapmaking Checklist to Keep You Organized
- Reference List of Soapmaking Abbreviations
- Helpful List of Soap Supplies & Resources

Circling Taiwan Swirl (with Activated Charcoal) Recipe
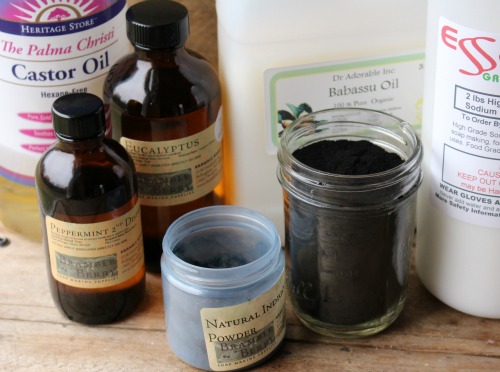
Oils & Butters:
- 15 oz (425 g) olive oil (41.67%)
- 7 oz (198 g) coconut oil (19.44%)
- 3 oz (85 g) rice bran oil (8.33%)
- 2 oz (57 g) castor oil (5.57%)
- 3 oz (85 g) sweet almond oil (8.33%)
- 3 oz (85 g) babassu oil (8.33%)
- 3 oz (85 g) sunflower oil (8.33%)
Lye Solution:
- 11 oz (312 g) distilled water
- 5.06 oz (143 g) sodium hydroxide (lye) (5% superfat)
Extras:
- 1/4 tsp activated charcoal + 1.5 tsp chlorella powder (to color black portion)
- 1/2 tsp indigo + 3 tsp Cambrian blue clay (for gray-blue portion)
- 1 tbsp (15 ml) eucalyptus essential oil (optional scent)
- 2 tbsp (30 ml) peppermint essential oil (optional scent)
Notes:
- This is a 3.25 lb recipe. (36 oz oil + 11 oz water + approx 5 oz lye = 52 oz)
- I used around a 3 pound mold and poured it thicker (taller) than my normal sized batches I use it for.
- Yield = 6 bars
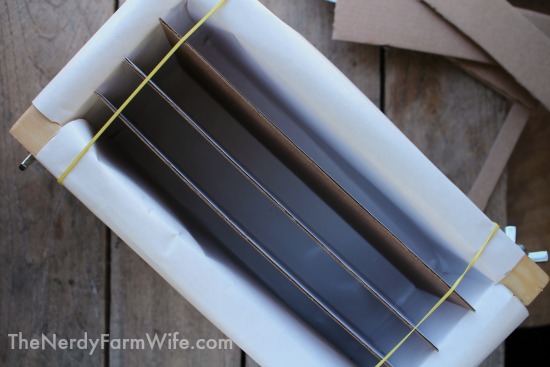
Prepare the Mold, Dividers & Work Area
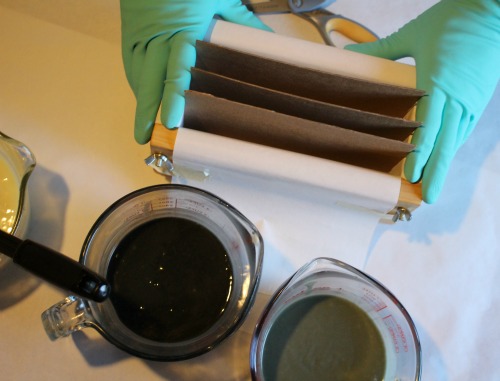
You can buy ready made dividers for some molds or you can make some from cardboard like I did. I made mine by measuring my mold’s length and cutting three pieces that would fit snugly within.
The tip was given to use packing tape to completely cover the dividers, but Christmas pretty much tapped me out of my tape supply, so I went without. (I’ll definitely try it in the future though, when I restock supplies.)
This project gets messy! Line a large work area with freezer or parchment paper for easier cleanup later and make sure to wear your gloves at all times.
After my first batch, I had my husband help hold the cardboard pieces in place since they tend to shift easily, even with the rubber band system I tried. If you utilize a helper, have gloves and proper safety gear for them as well.
Instructions to Make Soap
If you’ve never made soap before, be sure to thoroughly research the process and precautions before proceeding.
You can find more information in my Soap Making 101 post or check out my Natural Handmade Natural Soapmaking eBook Collection.
Step 1: In a small bowl, combine the activated charcoal and chlorella with a few teaspoons of your soap making oils (I used sweet almond) until a smooth mixture forms. In a separate small bowl, combine the blue clay and indigo powder with a tablespoon or two of distilled water until a smooth mixture forms. Set aside until you get to Step 6.
Step 2: Wearing safety goggles, gloves and long sleeves, weigh out the water and lye. Carefully sprinkle the lye into the water and stir well until the lye is fully dissolved. It will heat up quickly and give off strong fumes that you should avoid breathing in directly. I like to do this step in my kitchen sink (next to an open window), in order to contain any spills or splashes. It’s important to have a fresh air source, work outside, under a kitchen exhaust fan and/or wear a mask. Set the solution aside in a safe place, out of the reach of children and pets, and let cool for about 45 minutes. The temperature should drop to around 100 to 110°F (38 to 43°C) during that time. (Drop a few ice cubes in, if you need to cool it more before proceeding with the recipe.)
Step 3: Weigh the coconut and babassu oil into a small saucepan or double boiler. Melt gently over low heat, keeping a close eye on it. Weigh the other oils into your soap making pot or container and then pour the melted oils into there too. The melted oils should bring the temperature up to around 90 to 100°F (32 to 38°C), though you may need to heat them a bit more, depending on your room temperature. (My house runs on the hot side.) Don’t get too hung up on trying to make the temperatures match, but for this recipe you don’t want to mix too hot so your soap batter doesn’t thicken too fast.
If you’re adding the essential oils, now is a good time to do so, so you won’t have to think about it later in the mad rush of color mixing and pouring. Hand stir them into your warmed oils.
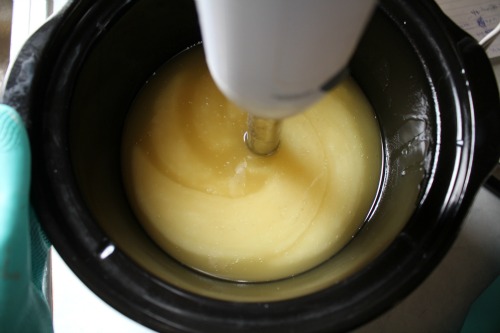
Step 4: Now, you’re ready to mix! Working carefully and still with gloves, goggles and long sleeves on, pour the lye solution into the oils. Stir by hand for around 30 seconds then begin mixing with an immersion (stick) blender. Do not use a hand mixer – you want a stick blender that looks like THIS.
Step 5: Blend for around 20 to 30 seconds, then hand stir some more. With this soap, you want to emulsify it and then barely reach a light trace, so be easy on how much you use the stick blender. (“Trace” means that your soap batter has gotten thick enough so that when you drizzle some of it across the surface of itself, it leaves an imprint or “tracing” before sinking back in.)
Step 6: Once you’ve reached a light trace, divide your soap batter into 3 containers or pitchers.
- Pitcher 1 – pour in half of the soap batter and keep it plain and uncolored.
- Divide the other half of the soap batter evenly between Pitcher 2 and Pitcher 3.
- In Pitcher 2 -stir in the indigo/blue clay mixture.
- In Pitcher 3 – stir in the activated charcoal/chlorella/oil mixture.
If you need to give a quick whirl with the stick blender to make sure the colors are blended well, you can, just be careful how long you run it for. It should only take a few seconds.
Instructions for Pouring & Cutting
Here’s where it will really help to watch the videos I linked above!
I didn’t take many pictures of these steps because juggling a camera with the quick actions that needed to happen here, just didn’t work out.
Basically though, you want to pour double thick, because you will be cutting your bar vertically, as well as horizontally.
So, in the first section, pour some of your plain soap (Pitcher 1), but not all the way to the top. Pour just a partial layer, then put that pitcher down and grab up Pitcher 2 (indigo/blue clay).

Pour a partial layer in the second section with Pitcher 2 (indigo/blue clay) then grab back up Pitcher 1 (plain soap) to pour a partial layer in the third section.
In the final section, pour some from Pitcher 3 (charcoal/chlorella).
Go back and repeat the process again, to finish filling the layers.
You can see (in the photo just above) that my soap was thickening up quite a bit by the time I finished this process.
Once poured, pull out your dividers and set them aside on freezer or parchment paper. Use a chopstick to make a zig-zag motion and then a swirl.
Check out the video, so you can see the exact motions that need to be made. I watched that part over a few times before attempting.
I wanted my soap to go through gel phase, so covered it with the mold top, then a blanket, then tucked it a close, yet safe distance, from my wood stove for the night.
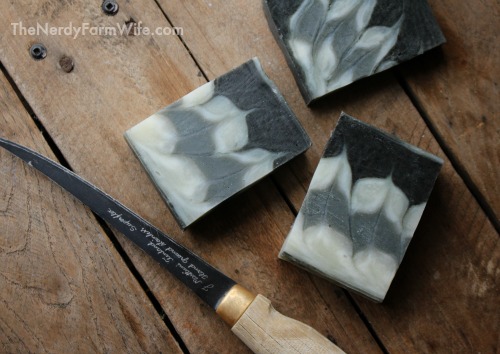
After a day or two, unmold and cut the loaf into approximately 2 1/4″ bars, then cut those bars again horizontally. (Video on cutting is HERE.)
To get the image shown in the very top photo on this post, I did a second horizontal slice within a finished bar, just to see what was inside. I was delighted to find an even more pronounced lotus flower when I put the two bars together!
Let your soap cure in the open air for at least 4 weeks before using or gifting.


Hi Jan,
I’m sorry this comment isn’t about your soap recipe…I love your website but am not a soap-maker; I just couldn’t help but notice your tattoo & was wondering what it means. I have a Chinese symbol in the same spot but on my right wrist. Just thought it was kinda funny! Feel free to delete this if the irrelevance to your post is annoying!
Hi Kristen, That’s completely cool to ask! I’m always curious when I see others too. :) It’s a Japanese kanji for “light”. What does your symbol mean?
Mine means “the way”.
I didn’t mention in my last post that the soap is really gorgeous. I don’t make it but I definitely love the homemade stuff. They always smell & feel so good!
Very cool! And thank you for the kind words about the soap! :)
I’ve been wondering if, particularly if using milk instead of water, your lye solution could be made ahead of time and chilled before adding to the oil? Is there too much of a chance of your oils solidifying or will the heat from the mix prevent that? I am interested in getting the whitest possible bar from a cold process milk soap.
Gorgeous soap in this recipe!
Hi Marci, Thanks! I love how it turned out too! :) I know some people make their lye solution ahead and let it cool to room temperature before using, but my suspicion is that if you chill the lye further, it might not be active enough. (I might be wrong though, since I haven’t tried it to know for sure!) Also, you’re correct that when temperatures are too low, you do have the risk of solidifying oils which could lead to a false trace. Some people use titanium dioxide (or zinc oxide, which is considered more natural) to whiten soap and others add some kaolin clay. Using lard and coconut oil or other white or light colored oils will help too.
I really like your circling Taiwan swirl. I’m going to try it. The swirls really fascinate me. Thanks for your post.
Hi Margaret, I hope you get to try it! Cutting the bars and finding the patterns hidden inside was so much fun!
This is INCREDIBLE, Jan!!!! Thank you so much!!!
Hi Rebecca, I’m so happy that you like it! :)
Hi Jan, your soap looks great. Just a thought.. would it be possible for you to put percentages of oils in the recipe? It really helps with working out the recipe for other size molds. Thanks for all you great work. Sarah
Hi Sarah, Thanks for the great feedback! I’ll definitely try to remember to include percentages in future recipes. :)
Sarah,
Percentages are to the right. I added .02 to the castor oil to make a total of 100% for your soap calc, and because bubbles are good.
15 oz (425 g) olive oil 41.67
7 oz (198 g) coconut oil 19.44
3 oz (85 g) rice bran oil 8.33
2 oz (57 g) castor oil 5.57
3 oz (85 g) sweet almond oil 8.33
3 oz (85 g) babassu oil 8.33
3 oz (85 g) sunflower oil 8.33
TOTAL = 36oz
Go nutz and make a slab! It’s a great design.
–Empress of Nerdia ;-)
Hi Karen,
Thank you so much for figuring those numbers out for Sarah – that was very kind of you!
I’ll add the numbers to the post in just a few. I appreciate it! :)
Hi Jan, I bought your first ebook on natural soap making book 1. I have not yet try to make soap but i plan too in the next few months I have been very busy, I was just checking out your web site after reading your news letter and was wondering if this ebook is the same or if its a new version please let me know.
Hi Helen! Yes, it’s the same one that’s been revamped and updated. I sent emails out to those who had purchased in the past, but my old system wasn’t very reliable and I’m afraid some were missed. It looks like you didn’t get the email, so I’ll send you one now, to the address you used for this comment & make sure you get your new copy! :)
Hi Jan, thank you for the updated copy and I forget to mention that I love your swirl soap it looks like a lot of hard work. keep up the good work you are doing you have inspired me to try my hand at soap making I am in the process of gathering my supplies will let you know how things turn out.
You’re welcome and thank you for the kind words! Happy soap making & keep me posted! :)
This Taiwan swirl turned out great! I really enjoy the dark charcoal in the bar and love that you used eucalyptus essential oil with this. =)
Thanks Anne-Marie! :)
Good morning, Can I substitute Babassu oil for another one?
Hi Marianella! You could replace it with cocoa butter, lard, tallow (or if you’re not a palm-free soaper – palm oil). Changing it might make the lye amount change too, so run the recipe through a lye calculator again to be sure.
Another idea is to use more olive oil; the soap may be a little softer at first, but will harden up as it cures.
(Anytime you’re not sure what to substitute for an oil – olive can almost always be used, since you can use up to 100% in a recipe.)
This post has more information on making substitutions like that:
https://thenerdyfarmwife.com/how-to-make-any-soap-recipe-palm-free/
Hello! I was wondering how does the soap feel on the skin? Also, are you using babassu oil to replace palm? your soap looks great!
Thank you!
Hi Sarah! I often use babassu to replace coconut oil, but it can make a great stand-in for a portion of palm oil in a recipe too. This soap has a mild, creamy lather that feels nice on the skin. It’s not drying but also not super moisturizing, so I’d say it’s good for normal to oily skin. If your skin is really dry, you could notch the coconut oil down a few ounces and replace it with a moisturizing oil (like avocado) and/or superfat it higher than 5%. (Running changes through a lye calculator.)