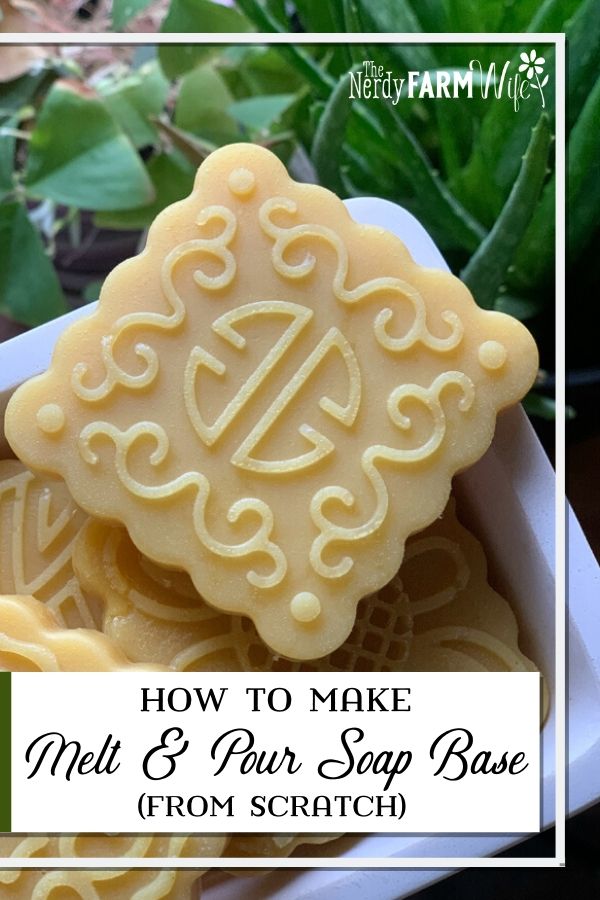
(From Scratch) How to Make Melt & Pour Soap Base
Learn how to make your own DIY melt and pour soap base using all natural ingredients.

Homemade soap base is perfect for creating shaped embeds for your cold process soap recipes, or if your kids want to make their own soap projects but aren’t old enough to handle lye.
It’s also just fun to do – I had a great time experimenting with these recipes!
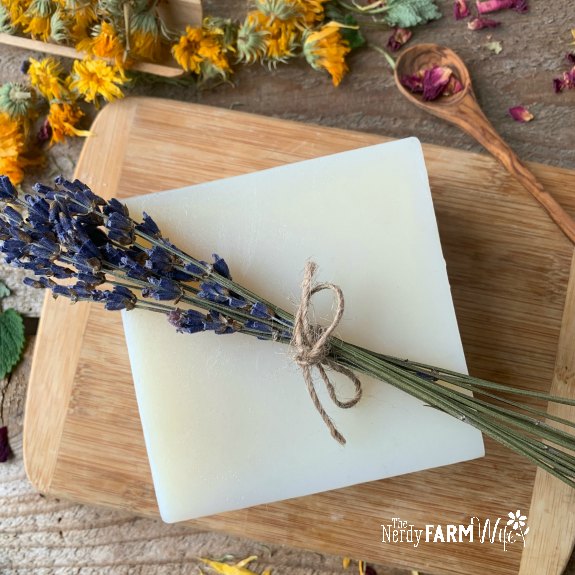
I like to infuse melt and pour soap with herbs and flowers; I feel like it gives the beneficial herbal properties a better chance of making it through to the final product. Being able to use my own homemade soap base + homegrown herbs and flowers from my garden makes it extra rewarding. :)
Just like cold process soapmaking, you can 100% control the ingredients that goes into your soap base.
Resources
For more information and DIY soap base recipes to play with, be sure to check out these wonderful articles and videos, which informed and inspired me while I was working on creating my own melt and pour base from scratch:
Before You Begin – FAQS & Tips
Are these soap bases clear (transparent)?
No, they’re not. Clear melt and pour soap is usually made with propylene glycol, which I didn’t have or want to use, plus it’s not as easy to obtain as vegetable glycerin. I also use way more white soap base than clear, so that was my area of interest during my experiments.
If you want to make a clear melt and pour base, check the resource links at the top of this article.
My recipes will yield an off-white somewhat translucent (but not transparent) soap, unless you add zinc oxide, which will make the soap base a bit whiter and more opaque. (But still not as white as commercial base.)
What size crock pot is needed?
For this recipe, I use a 4 quart crock pot (slow cooker), picked up at my local big box store. Make sure not to use one with a non-stick or Teflon inner coating since it will react negatively with lye.
Why add arrowroot powder to soap base?
This is optional.
When I was making my print book, Easy Homemade Melt & Pour Soaps, I made a LOT of soap using ready-made soap base. Many of my personal favorite projects included a blend of arrowroot and aloe vera – I loved the creamy feel and boost to lather that it gave soap. As a bonus, I noticed that those soaps seemed to sweat less, or not at all, even when I accidentally left them unwrapped during a stretch of rainy days.
So, when I decided to make my own melt and pour from scratch, I knew I wanted to add arrowroot to the base itself, to hopefully help offset the large amount of glycerin added to make the soap dissolvable.
You can leave the arrowroot out of the recipe if you wish, or you might be able to swap cornstarch for it. (I haven’t tried that in from-scratch recipes, but it works with ready-made commercial bases.)
It’s possible the recipes will support more arrowroot, but I haven’t experimented with a higher amount to date.
Will this soap base sweat?
Yes, in humid climates.
Melt and pour soap is rich in glycerin (which is what makes it meltable) and will sweat (develop glycerin dew on the surface) in humid environments, even with added arrowroot – ‘tis the nature of the beast!
If you find your soaps sweat badly in your climate, investing in a dehumidifier for the room they’re stored in could be a great investment. You could also try DampRid containers in the area. (I often use two of these at a time during peak humidity in summer, and keep them beside soaps and bath bombs stashed in a small area, such as a closet.)
As with regular melt and pour soap, wrapping the finished soaps in airtight packaging will help prevent sweating. (Looking for biodegradable shrink wrap? Check out Biolefin at The Nova Studio.)
Why beeswax or soy wax?
These were added for an extra bit of hardness. Soy wax is a palm-free source of stearic acid (87% stearic acid), which helps harden soap. Beeswax provides a less processed and different way of hardening the soap base. You could possibly swap this with stearic acid (running the new recipe through a lye calculator).
Should you cure homemade soap base?
It seems like most soapers use their homemade melt and pour soap base right away, but I wanted to see how it performed if it was well cured first. (HERE is an excellent article on why curing time is so important for soap.)
I made several batches of the following soap base recipes and wrapped half of each loaf in plastic wrap right away, leaving the other half of each to cure in the open air for 5+ weeks.
Comparing the various soaps at various stages I found that:
- Soap bases wrapped in plastic wrap right away had a lower creamier lather than soaps cured in the open air for 5+ weeks. The cured soap bases had nicer bubbles.
- Soap bases that had cured 5+ weeks in the open air felt noticeably better on my skin.
- Visually, I couldn’t tell the difference between cured and uncured loaves of soap base.
- Melting-wise, base cured in the open air for 5+ weeks had a thicker texture, even when fully melted, and set up more quickly. My guess is that happens because of water evaporation during cure time.
In summary, I like the cured soap bases best.
If your soap develops glycerin dew on the surface while curing, you can dab it off with a paper towel or clean (non-linty) dishtowel. It will still melt up fine when the time comes to make projects with it.
Soap base recipe variations:
Here are a couple of ideas to add variety to your soap bases:
- Aloe Variation: Aloe vera liquid can be used to replace part or all of the water. (Note: I’ve noticed more sweating in my soap base made with 100% aloe liquid, though this observation needs more testing.)
- Milk Variation: Blend 1 to 2 teaspoons of milk powder (coconut, goat, cow) into the melted oils, along with the arrowroot powder, if using.
A note about zinc oxide:
Soap bases made without zinc oxide powder are more translucent (but not transparent) and an off-white color.
They work really great just like that!
However, adding a small amount of zinc oxide will give a more opaque and whiter color, and added colorants will be turn out a little more pastel-ish in color, closer to when you use commercial white soap bases.
I haven’t personally used titanium dioxide, so can’t be sure of an amount if you want to use that instead of zinc oxide. I believe it should work fine though; I’m just not sure how much to use compared to zinc oxide.
Please note that you may get a thin layer of whiter soap on the surface of your finished soap base, depending on amount of zinc oxide used and your mixing and cooking techniques. That layer will melt back into the soap base when you melt it for projects, so I always leave it on, rather than trim it off.
Rate I settled on: 1 to 1 1/4 teaspoon zinc oxide per pound (16 oz) of oils in the recipe. Using 1 tablespoon per pound of oils (PPO) just resulted in a thicker white layer of soap on the surface of the soap base, but no noticeable extra whitening compared to 1 1/4 teaspoon. I used Bramble Berry’s zinc oxide for all of these experiments.
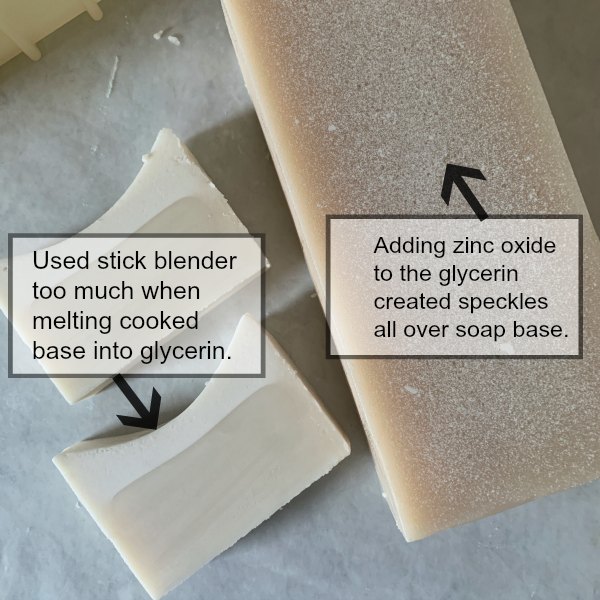
Mistakes were made!
For one experimental batch, I tried mixing the zinc oxide with the glycerin before adding it to the cooked soap base to further cook and dissolve. This was a big mistake!
The zinc oxide formed a thick gummy layer on the sides of my crockpot that was horribly difficult to clean off and stuck to my fingernails like nail polish while I scrubbed! It also left zinc oxide speckles all over the surface of the soap and did not whiten the soap base.
This is why I recommend adding the zinc oxide to the warmed oils before adding the lye solution.
Another mistake I made in a different batch was to use my stick blender too vigorously to mix the soap base into the glycerin. (I got impatient waiting for it to melt in!) I ended up with a loaf of soap base with a thick foamy whiter top. It still melted down okay to use, but it sure looked funny until melted!
What’s the difference between these homemade bases and commercial bases?
Honestly, they’re quite different!
You’re able to completely control the ingredient list in these homemade bases, and make them as natural, organic, palm-free, etc as you’d like.
However, I find that my homemade bases need higher temperatures to melt, plus they harden up faster, so you have to work quickly to get the soap colored and in the mold.
My homemade bases were also more difficult to strain after infusing with herbs. Difficult, but not impossible! It especially helped to stir in about 1/2 teaspoon vodka for every ounce or two of melted soap. This thinned it out and made it easier to push through a fine mesh sieve, but the alcohol might make things more difficult if you plan to remelt the soap yet again. (Which I normally don’t after infusing.)
At this time, it seems like homemade base doesn’t work well for whipped soaps. (I still need to experiment with this more though, to figure an optimal temperature.) I haven’t tried swirling with it either because of its thick texture; I’m not sure it will work well for swirls, though I may be wrong.
These soap bases work best with simple melt, color, and pour types of projects.
A main benefit of commercial bases are that they’re designed for ease of use. You can’t control ingredients and sometimes they can feel drying on your skin, but they’re more predictable than homemade base, and they are easier to work with in many ways.
So be aware that there are differences between homemade and commercial bases and adjust recipes and expectations accordingly.
DIY Melt & Pour Soap Base Recipes
Here are three recipes that I liked best from my experiments.
My favorite is the triple butter soap base, but I realize not everyone has access to kokum butter, so created a double butter version, plus a simpler shea butter version.
Last fall, I also created a tallow variation, but I’ve misplaced the recipe since then! I believe it had around 40% tallow, but I’m not 100% sure on exact amounts. If I find it or remake it, I will update this space.
If you need to make any substitutions, use a lye calculator such as Soapee.
I found that anything over 15% castor oil made the soap sweat more easily, so go easy on the amount if you design your own recipe.
DIY Triple Butter Melt & Pour Soap Base
This is my personal favorite. Use a scale (weight) to measure the oils, butters, wax, lye (sodium hydroxide), water, and glycerin. Don’t use measuring cups (volume measurements) to make soap.
If you’ve never made soap before, check out my Soapmaking 101 article for more information and safety tips. I suggest starting with a simpler recipe, such as Oatmeal Honey Soap, before trying to make your own melt and pour soap base.
Yield: about 40 oz (1134 g) of soap base
- 1.92 oz (54 g) cocoa butter (12%)
- 1.92 oz (54 g) kokum butter (12%)
- 1.92 oz (54 g) shea butter (12%)
- 0.16 oz (5 g) beeswax (or soy wax*) (1%)
- 4.96 oz (141 g) coconut oil (31%)
- 3.2 oz (91 g) olive oil (19%)
- 1.92 oz (54 g) castor oil (13%)
- 2.25 oz (64 g) sodium hydroxide (lye) – 5% superfat
- 6 oz (170 g) distilled water (abt 2.65:1 water: lye ratio)
- 1 tbsp (9 g) arrowroot powder, optional
- 1 to 1 ¼ tsp zinc oxide, optional for whiter soap
- 14 to 16 oz glycerin (use less in a more humid environment)
*Omitting beeswax and replacing it with soy wax will slightly change the lye to 2.26 oz, which still equates to 64 grams.
The directions to make this soap base are below the recipe section.
DIY Double Butter Melt & Pour Soap Base
Use a scale (weight) to measure the oils, butters, wax, lye (sodium hydroxide), water, and glycerin. Don’t use measuring cups (volume measurements) when making soap.
If you’ve never made soap before, check out my Soapmaking 101 article for more information and safety tips.
Yield: about 40 oz (1134 g) of soap base
- 3 oz (85 g) cocoa butter (19%)
- 2.75 oz (78 g) shea butter (17%)
- 0.25 oz (7 g) beeswax (or soy wax*) (1.5%)
- 5 oz (142 g) coconut oil (31%)
- 3 oz (85 g) olive oil (19%)
- 2 oz (57 g) castor oil (12.5%)
- 2.25 oz (64 g) sodium hydroxide (lye) – 5% superfat
- 6 oz (170 g) distilled water (abt 2.65:1 water: lye ratio)
- 1 tbsp (9 g) arrowroot powder
- 1 ¼ tsp zinc oxide, optional for whiter soap
- 14 to 16 oz glycerin (use less in a more humid environment)
*Omitting beeswax and replacing it with soy wax will barely change the lye to 2.26 oz, which still equates to 64 grams.
The directions to make this soap base are below the recipe section.
DIY Shea Butter Melt & Pour Soap Base
Use a scale (weight) to measure the oils, butters, wax, lye (sodium hydroxide), water, and glycerin. Don’t use measuring cups (volume measurements) when making soap.
If you’ve never made soap before, check out my Soapmaking 101 article for more information and safety tips.
I used sweet almond oil instead of olive oil in this recipe. You may wish to use olive oil instead.
Yield: about 40 oz (1134 g) of soap base
- 5 oz (142 g) shea butter (31%)
- 0.5 oz (14 g) beeswax (or soy wax) (3%)
- 5 oz (142 g) coconut oil (31%)
- 3.5 oz (99 g) sweet almond oil (22.5%)
- 2 oz (57 g) castor oil (12.5%)
- 2.21 oz (63 g) sodium hydroxide (lye) – 5% superfat
- 6 oz (170 g) distilled water (abt 2.65:1 water: lye ratio)
- 1 tbsp (9 g) arrowroot powder
- 1 to 1 ¼ tsp zinc oxide, optional for whiter soap
- 14 to 16 oz glycerin (use less in a more humid environment)
The directions to make this soap base are below.
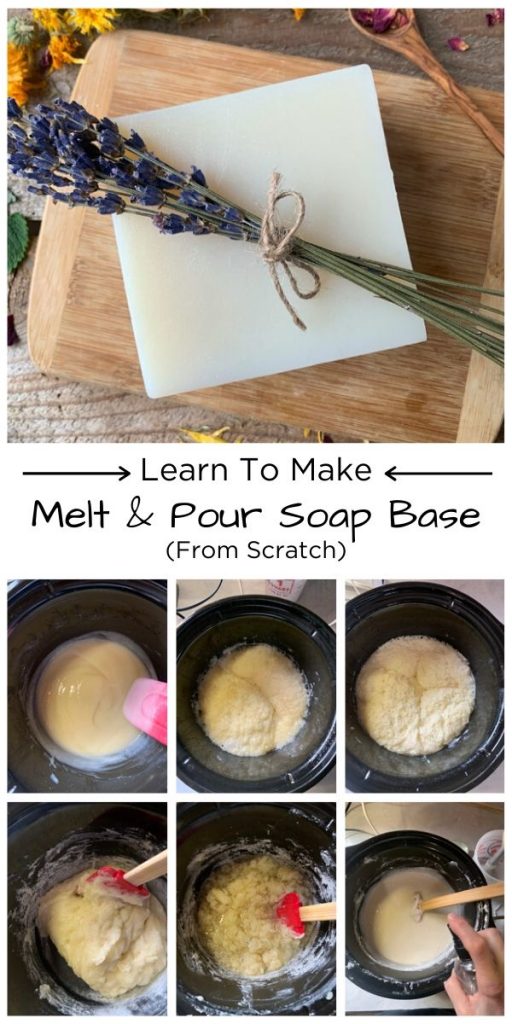
Directions to Make Soap Base from Scratch
Step 1 – Melt the butters, wax & oils.
Turn your crockpot or slow cooker on high. Add the wax and butters, making sure the butters are broken up in small pieces first, for ease of melting. Add the coconut oil, olive oil, and castor oil, and any other liquid oils (like sweet almond) that the recipe calls for.
Cover the crockpot with its lid.
Step 2 – Make the lye solution.
After the wax, butters, and oil mixture have been melting for about 10 minutes, start the lye solution.
Wearing gloves and goggles and using proper safe soapmaking procedures (see Soapmaking 101), carefully sprinkle the lye into the water, using heavy duty plastic or stainless-steel containers. (Glass can shatter, and aluminum or cast iron can react negatively with the lye, so are not recommended.)
Stir until the lye is completely dissolved. Avoid breathing in the momentary strong fumes and use caution when handling lye. Set the lye solution aside for a few moments in a safe spot, such as your kitchen sink.
Step 3 – Blend in arrowroot & zinc oxide, if using.
Check the wax, oils, and butters mixture. If needed, use a fork to break up any unmelted bits, to help them melt faster. They may need another 5 or 10 minutes to finish melting.
Once those are melted or almost melted, add the arrowroot powder and zinc oxide if using, then blend into the oils with a stick blender.
Step 4 – Combine the lye solution and oils.
Turn the crockpot to low.
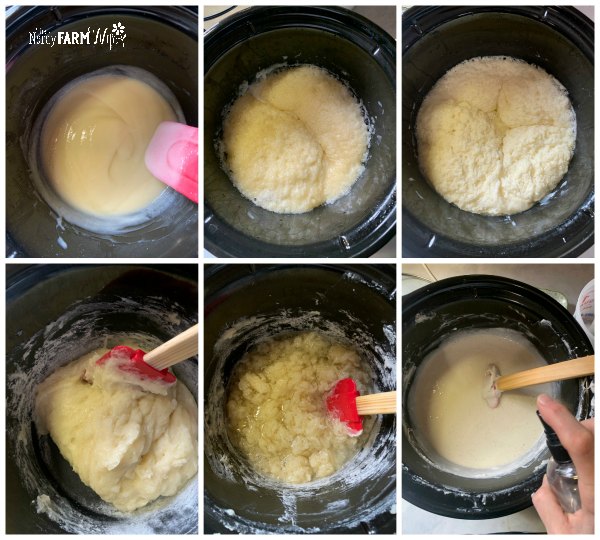
Pour the lye solution into the oils/butters/arrowroot mixture. Using a combination of hand-stirring and brief pulses with your stick blender, bring the mixture to trace.
Step 5 – Cook.
Cover the crockpot with its lid and set a timer for 15 minutes. Keep an eye on the soap, between the 15 minute intervals, since it may expand up to the top of the crockpot. If that happens, just stir it down until it behaves again.
After 15 minutes, check the soap and stir it.
Set a new timer for 15 more minutes, then check and stir again.
Set the timer for 15 more minutes of cooking.
At this point, your soap has been cooking for around 45 minutes. You might notice it turning more translucent and Vaseline-like because it’s gelling, though it will be harder to see with zinc oxide added to the batch.
Because crockpot temperatures vary widely, your soap may reach this stage sooner, or later than 45 minutes. These photos just show how my crockpot runs.
Cook for 15 more minutes, for a total of 1 hour cook time.
Step 6 – Add the vegetable glycerin.
Weigh out 14 to 16 ounces of glycerin and stir into the hot soap paste in the crockpot.
Mix well.
Glycerin is what makes the soap base able to be remelted. If you live in a humid climate, you may want to use less glycerin, but the less you use, the less easily the soap will melt. It’s a bit of a trade-off!
Step 7 – Dissolve the soap paste into the glycerin.
Cook for 20 to 30 minutes, stirring occasionally.
If needed, sparingly use your stick blender to gently and briefly pulse floating chunks of solid soap so that they blend into the glycerin better. Don’t overuse your stick blender here, or you’ll get lots of unwanted bubbles and foam on top of your finished soap base.
Cook until the soap paste has completely melted into the glycerin. This depends on your recipe and crock pot temperature and might take anywhere from 30 minutes to an hour or longer.
Tip: You can spritz the top of the soap generously with rubbing alcohol to help decrease bubbles & foaming on top while melting the glycerin and soap together.
Step 8 – Finishing up.
Pour the finished soap base into a soap mold and generously spritz the top with alcohol.
Tip: The mold I used for this project is Crafter’s Choice Regular Silicone Loaf Mold 1501.
Leave the soap base undisturbed and uncovered overnight or for 12 to 24 hours, to allow the soap time to completely cool and harden.
Remove soap base from the mold.
If you added zinc oxide to the oils for a whiter soap base, you may notice a thin whiter layer of soap on the top of the soap base. That’s normal for these recipes and will melt together nicely when you make your projects.
As mentioned above in the tips section, I let my soap base cure for a few weeks in the open air before using, but that’s optional. You may also use the base right away if you wish!
Using Homemade Melt & Pour Soap Base
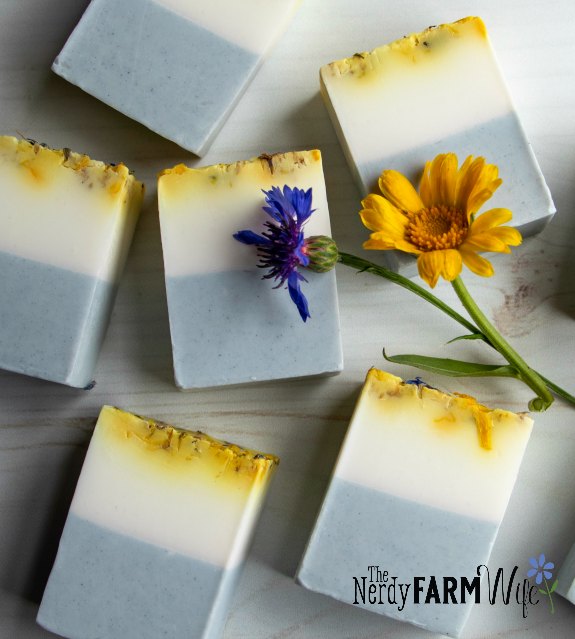
So how does our homemade soap base compare to commercial base?
The photo above shows an example of soaps melted and colored with:
- madder root (1/8 tsp per 4 ounces of base)
- spirulina (1/8 tsp per 4 ounces of base)
- indigo (1/8 tsp per 4 ounces of base)
On the left, are soaps made with SFIC palm free white soap base purchased from Soap Goods, and on the right are soaps made with my homemade melt and pour soap base.
As a bonus, I noticed that homemade base is a lot less likely to get speckles from the colorants, likely because of the thicker texture.
Please note that the homemade base will thicken up a little faster than commercial base. Also, because the commercial white bases contain titanium dioxide, they will have more pastel tones than homemade base.
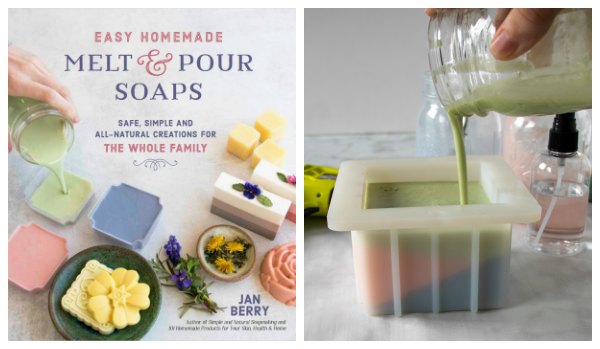
For more natural colorant ideas, essential oil rates, blend ideas, and more helpful information about combining natural ingredients + melt and pour soap base, be sure to check out my print book, Easy Homemade Melt & Pour Soaps!


Wow this is amazing! thanks for all the work you out into the recipes
Hi Kathy, I’m so glad you like the post! It’s been a lot of fun experimenting with homemade melt & pour! :)
Hello!
Thank you so much for the recipe! I’ll definitely try it!
What do you think about adding half of Glycerine and half of Propylene Glycol? Would it make remelting easier? I love the fact that you didn’t use any alcohol!
Ana
Hi Ana! I think you could definitely add some propylene glycol, though I’m unsure of the best amount/ratio. It should make remelting easier! :)
Hi jan … can you please help me with goat milk soap base making , at what stage shall I add fresh goat milk .
Hi Neha! I’ve never used fresh milk in this base – my thought is that the longer cooking time may scorch the milk.
If you want to try it though, you may be able to use tips and techniques such as shown in this video (using milk for the lye solution & keeping it cool), for making hot process milk soap that doesn’t scorch:
https://www.youtube.com/watch?v=s9Jjarino90
If you try it out, let us know how it goes! :)
Can you omit the wax?
Hi Alexandria! I haven’t tried this recipe without the wax, so I’m just not sure.
You could probably make a test batch & see!
I wouldn’t omit the amount completely though, but rather replace it with something else, like more butter, then run the change through a lye calculator.
If you give it a try, let us know how it goes! ?
All the way I searched for natural soap base, Thx for this awesome information!
Lovely soap making….Your post inspired me a lot to try DIY melt and pour soaps
So happy to hear that Nag! Happy Soapmaking! ❤
Thank you so much for this! I definitely want to try. I’m especially interested in a tallow recipe, as you mentioned, since we live on a farm and have abundant tallow. ?
Hi Jenny! So glad you like the recipe! I believe you could swap out the butters for tallow (and even add an extra 5% or so of tallow if you’d like) and get pretty close to where my recipe was. :)
Jan, this is amazing. Thank you for creating these recipes for those of us DIYers that would rather not rely on commercial products. Pinned for later.
Hi Chris, Thanks for pinning and I’m so glad you like the recipes! :)
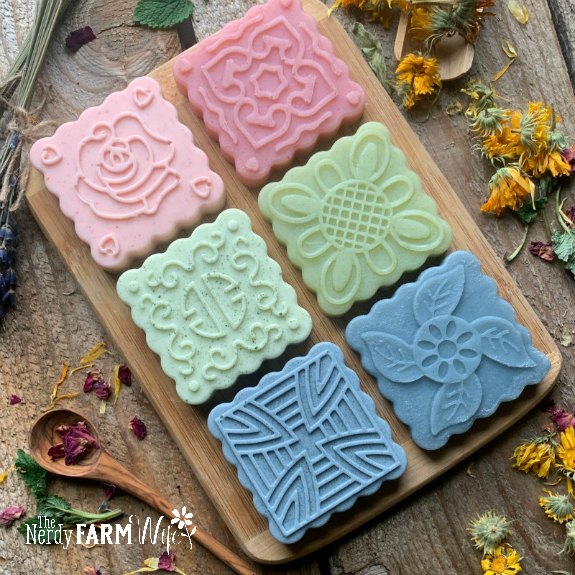
An you please tell.me where you got the molds that you used (Top picture:. Pink, green and blue soaps)? They’re lovely!!
Hi Connie! Those are mooncake silicone molds from Amazon – they’re great little molds; I love them!
https://amzn.to/381TMqj
I’m hoping you can help me out with an alternative to castile soap in liquid and foaming soap recipes. My daughter is allergic to coconut everything! I have made so many of your recipes using avacado or olive oil and love them, but I don’t know if they will work with soap recipes. Any ideas would be great! Thanks so much for your help and all of the things I have learned from your blog ??
Hi Anne! You can make liquid soap that includes olive and avocado oil and leave out the coconut. In liquid soap, the oils do funny things that you have to keep in mind. For instance, olive oil makes a very thick soap that needs lots of water to dilute, while coconut oil can make a thinner soap. It’s good to balance several kinds of oils together whenever possible. Can you use babassu oil (to replace the coconut)? How about castor oil? What other kinds of oils do you have available to work with? Being allergic to coconut is definitely challenging – it’s one of those things that seems to be everywhere! I’ve long wanted to do a coconut-free soap article or series; it’s still on my to-do list. Hopefully this year!! :)
Hi Anne. Thanks for the article. My granddaughter has super dry skin. Do you have a melt and pour without coconut oil?
Hi Melanie!
My top suggestion for replacing coconut oil is to test out using babassu oil instead.
It has similar bubbly/lathering/hardness properties but is less harsh on your skin so people that are sensitive to coconut, often have better luck with babassu.
Hi Jan! I make CP goat milk soap. I am going to try this but would like to use milk instead of water. Have you tried that? I saw where you could add powdered milk. I love all of your books and your soaps are beautiful! Thank you for doing what you do and sharing it with us. Lori
Hi Lori! Thanks for the kind words about the books and soaps! <3 I suspect using fresh milk could overheat as it cooks and darken the soap base, but I haven’t really experimented with the idea yet, so am not 100% sure on that. It might work out! If you give it a try before I get a chance to, I’d love to hear how it goes for you! :)
So can this soap be remelted and used for a child craft event ? Adding various things then allowing to harden again.
Hi Emma! Yes, it sure can! The only thing about homemade base is that it’s a bit thicker and it hardens up faster than commercial melt and pour soap base, so it isn’t as easy to do intricate things with. Basically with this homemade base, you can melt it, stir in something extra fast (colorant, scent, poppy seeds, etc), and then pour right away before it sets up. You have to be able to work quickly, so younger children may do better with a commercial melt and pour soap base that’s a little more forgiving. :)
I’m glad I scrolled through the comments before asking this question myself! I will be running a soap making club with 4-6 graders next fall as an after school activity. Obviously melt and pour is the way to go with that age range, but my skin is reactive and grumpy and has an absolute fit when it comes in contact with pretty much any detergent! Which seems to be what a lot of commercial melt and pour bases are. I may start the kids with from scratch melt and pour and simple designs, then move on to commercial when they are a little more capable and I’ll have to work with it less!
Hi Lily, That sounds like a good plan! I hope they have lots of fun!
You could also look for extra gentle bases – Essentials by Catalina has a sulfate free one:
https://essentialsbycatalina.com/artisanal-sulfate-free-melt-pour-glycerin-soap-base
and SFIC bases are detergent free & have less junk compared to most commercial bases – I have sensitive skin & can handle SFIC’s goat milk base, shea butter base, and cocoa butter base nicely. :)
Hi. I just purchased your book! What size crock pot should I purchase?
Hi Rosemary! Thank for buying the book! :) I use a 4 quart crock pot when making soap.
Hi Jan, love your website and books very inspiring . I got a question regarding your melt and pour soap. 1.Could i use 100% Coconut oil only and no other oils. 2. How do you work out the amount of glycerin for the melt and pour soap.
Hi Mor! I haven’t tried making pure coconut oil soap base, but this video shows a recipe using almost all coconut oil + a bit of castor oil:
https://www.youtube.com/watch?v=cJSfEtGcals
It might have some tips in the video or the blog post that’s linked under the video.
For the amount of glycerin – thanks for asking that! I see I forgot to mention that in the post; I’ll fix that. You can use all the way up to the weight of the oils in your recipe.
So if you have 16 ounces of oils in the recipe, you can add in 16 ounces of glycerin. If you live in a humid climate and want less sweating, you can experiment with adding less glycerin.
Hi Jan, thanks for your reply. I will try out the recipe thats they used on the YouTube, to get a feel of mp and if i dont like it i will try out hp. Then i might try it with 100% Coconut oil and add coconut milk at trace with 20% super fat. Make the soap before like that with no problem and thought i will take it one more step up and try it out in mp. Might try it with a 60 % glycerin. What can i say i like to experiment.
Good day
I have been looking for recipes…will def inately try them .
Thank you
Pinky
Hi Pinky, So happy to hear that the recipes might be helpful! Happy soapmaking! ?
Hi Jan,
I am REALLY into the melt and pour soaps. I made your shea butter recipe. I think it turned out pretty darned good actually. However, my crock pot was older and it really took me a looooooooong time to melt it down. I have since bought a new crock pot just for soap. It was my first time to actually make soap from scratch. My interest definitely lies in the melt and pour, made to order model! I want to get really good at melt and pour bases. What I would really like is a bit more lather. I have found that sometimes sweet almond oil makes the soap creamy instead of bubbly. What I want is a nice melt and pour base that is high in blubbles and lather. Also, one of my favorite ingredients is aloe. What would you suggest for my next batch of melt and pour soap?
Hi Melonie! Did you cure the soap first, or use it right away? I’ve found that curing homemade melt and pour really helps boost the lather and improves the feel.
Other ways to get more lather include:
Using all aloe liquid instead of water in your recipes and increasing coconut oil, castor oil, and/or babassu oil in the recipe.
Another tactic could be to try swapping tallow or palm, if you use them, for some of the butter in the recipe.
Commercial melt and pour bases often have detergents added that help give them great lather, so one idea to consider is to add something like SLSA to the recipe.
I’ve thought of testing this out, but haven’t tried it yet. Here’s a thread I saved to remind me of a starting amount, when I do go to test it out! :) https://www.soapmakingforum.com/threads/sodium-lauryl-sulfoacetate-in-cp.45646/
Hi Jan
Can I use this homemade melt and pour soap base with any recipes made for melt and pour soaps. I do have your book and I used a recipe from it to make my first melt and pour soap from a purchased base. It came out great. It’s only myself and my son so I like to make smaller batches of different scented and types of soap for us. I’m also hoping that making my own melt and pour base will be more cost effective. Thanks for the help in advance.
Hi Cindy! The homemade base is best used for simple recipes, since it’s a little different to work with than commercially made melt and pour base. It’s a little thicker and sets up faster, but it takes colors well and you can infuse it if you work quickly. I’m not sure it’s more cost effective to make your own though. If you’ve not made soap before, then by the time you invest in the equipment and bulk ingredients, it’s probably cheaper and a lot easier to buy a ready made base. However, if you have allergies or reasons you can’t use a commercial base, it would probably work out well! :)
Hello, I made a block of your triple butter soap base and am getting to the point where I want to give it as gifts. I have a few molds in mind, though I noticed in another comment you mentioned how tricky it can be to work with as it is pretty thick. What is your preferred method of melting? I had been using a double-boiler with the commercial bases I was using before, but I kinda wonder if higher heat might be necessary.
Hi Nick! To melt homemade base, I put chopped pieces in a wide mouth heatproof canning jar, cover the jar with the canning lid or a saucer (to prevent it from drying out), then place it down into a small saucepan filled with water. Heat that over a medium-ish burner until melted.
Since I’m sometimes (usually) impatient to start a project, I often jump start the process by melting it in the microwave for about 10 to 20 seconds at a time, or until I see it start melting at the bottom of the jar, then move it over to the saucepan.
Thanks Jan, I had a fun project with my kids where we made some soap in their favorite colors.
The bars on the left are for my wife’s business, the ones on the right are for gifts, specifically some are going to grandma for her birthday. So far everyone loves how even just holding them in your hand feels like you are almost giving your skin some lotion, as opposed to the cheap bars feeling your skin feel dry.
Hi Nick, Those look amazing! I love them! Thanks for sharing how the recipe went & I’m so happy you had fun making soap with your kids!
I forgot the link! Whoops.
http://imgur.com/a/2lQljej
Hi, I tried making your double butter soap above (this was my first soap making experience) and I was wondering if you could give me a suggestion on what may have gone wrong. Once I added the glycerin it wouldn’t become smooth. I kept trying to get the lumps out with the emersion blender and stirring occasionally but after 20 minutes it started to harden quickly. it was almost to a solid and I had to basically coax it into the mold. I think my crock pot temperature may have been too hot, even though I changed it to low when specified but I am not sure why it wouldn’t become smooth and what I did wrong. Prior to adding the glycerin, it resembled your pics and video. Any idea? Can I still use this as a melt a pour soap base if I grade it?
Thank you!
Hi Danielle, Sorry to hear that the recipe gave some trouble! Melt and pour from scratch can be a little bit more challenging to make, even for experienced soapmakers.
Your guess that the crockpot was too hot sounds like a good possibility. When a crockpot runs hot, it tends to evaporate out the water faster which makes the soap drier, thicker, and harder to work with.
I’m thinking that the heat may have dried out the soap base too much, so if that happens again, possibly adding extra hot water, a little at a time, may help soften things back up.
What type/brand of glycerin did you use? I can take a look and make sure it’s the right kind. Also, was your glycerin cold or room temperature when you added it?
I’m not sure how the soap will melt now that it’s made, but I’d definitely give it a try with a small amount and see!
If it doesn’t melt easily, even with a little extra water added, then it might be best to slice it into bars and just use it as a handmade soap without melting it. It should still work nicely for regular soap use! ?
Thanks Jan, I will try to melt some after 5-weeks cure time and see what happens. It is sweating a lot and I since have put a fan on it but its still sweating. I used 15 oz glicerin and live in Southern CA. I used the “Now Solutions” Vegetable Glycerin 100% pure versatile skin care. I’ll let you know what happens.
Hi,
I just wanted to give you an update on this….I re-melted the soap to use in as a melt-and pour soap base for another recipe and it came out absolutely fine.
I am now looking to find a recipe for a DIY melt and pour goats milk soap base but have had no luck finding one online. I love the idea of making everything from scratch. Do you happen to have a recipe you wouldn’t mind sharing?
That’s great to hear – thanks for the update! I’ve successfully added milk powder to DIY melt and pour soap base, but instead of diluting it with distilled water, I blend 1 to 2 teaspoons of milk powder (coconut, goat, cow) into the melted oils before adding the lye solution. I haven’t made homemade base with fresh milk though since I’m concerned about the cook time involved. (It might work perfectly fine though – I’m just not sure since I haven’t tried it!) :)
Hi
Love your recipe. Please send me an email address . Do you have online classes . I am based in South Africa
Hi Julie! You can contact us through this link with your soapmaking questions:
https://thenerdyfarmwife.com/contact-me/
We do have an online class too! :)
https://nerdyfarmwife.teachable.com/p/soapmaking-success
Hello Jen,
What a lovely post. Thank you.
I want t9 make goat milk melt and pour base. I use goat milk from the Amish for all of my soaps. I am wondering if I could add powdered goat milk yo the distilled water, or just use regular goat milk in place of the distilled water?
Thanks so much for taking the time to read and hopefully answer my question.
LaDonna
Hi LaDonna, So happy to hear you like the post! I haven’t tried regular goat milk in place of distilled water, but my concern is that it would scorch over the cooking time. (Since I haven’t tried it though, I might be wrong in my assumption!) I’ve successfully added milk powder though, but instead of diluting it with distilled water, I blend 1 to 2 teaspoons of milk powder (coconut, goat, cow) into the melted oils before adding the lye solution.
Happy Soapmaking! :)
Hi LaDonna,
I am in search of the same thing, a DIY goats milk melt and pour base. Have you had any luck finding one or making one? If so, could you share?
Thanks,
Danielle
Extremely happy for this post. I gathering ingredients to try ASAP.
Thank you.
Hi Rachael, I’m so happy to hear that you like the article! Happy soapmaking!?
I have latex allergies, and Castor Oil’s in the rubber plant family. Is there a reason the M&P recipes use so much? (I can get away with 5% in a HP soap recipe without my skin going crazy, especially if I add my superfat after the cook–not sure if that makes a difference, but I do it just in case!) If I drop the amount of castor oil in this recipe, would you recommend increasing a solid or a liquid oil to compensate?
Hi Minerva! Castor oil helps promote and support bubbles, so soap made with it tends to have better lathering and bubble factor.
However, I believe you could swap it out. You can’t just drop an oil though, you have to replace it with an equal amount of another oil. (Double checking it with a lye calculator such as Soapee.com.)
In regular soap recipes, you can just replace castor oil with another liquid oil and then add in other lather boosting ingredients such as aloe, honey, or milk.
Melt and pour soap base is a little more finicky. So when you swap it, your soap will end up with unknown characteristics.
It’s definitely worth a test batch though in order to be able to make something you can enjoy without driving your skin crazy! ❤
Hi Jan,
I was wondering if you have a good recipe for a DIY melt and pour oatmeal soap base. I made the triple butter one above and loved it.
Thank you,
Danielle
Hi Danielle, So happy you like the recipe! :) I love the idea of a DIY oatmeal base! I bet you could add colloidal oatmeal to the same basic recipes. Perhaps start with around 1/2 to 1 tbsp colloidal oats & adjust from there. If you give it a try, let us know how it goes!
HI Danielle,
I tried this recipe.
My recipe comprised of the following:
Shea butter
Coconut oil
Almond oil
lye
water
i followed each step and added the glycerine at the end
the next day i tried to melt the soap base and it frothed and foamed in the microwave and the resulting bar is very springy.
when i was melting in the microwave the base started to froth.
can you help with this?
Hi Naseema! Can you tell me the exact amounts of butters, oil, lye, and water you used in your recipe?
Did you add any type of wax?
I wonder if your microwave heats hotter than mine?
Mine is 700 watts. If yours is stronger, it might help to melt your soap base on a lower power setting.
Homemade melt and pour is also fussier about melting than commercial base. You have to babysit it quite a bit unfortunately.
If you let me know more details about your recipe, I’ll take a look and see if I can help troubleshoot better! ❤
I tried a different recipe a few days ago that asked for 100% glycerin. It sweating like crazy for 3 days now. I’m in S. Utah where humidity is in the mid 20’s which (being from the northeast) I do not find to be a high humidity at all. My question is what is the percent range that will result in a good meltable melt and pour? Is that say 75 – 100% or what? I have but did not add arrowroot which I know will absorb but I’d rather not. I’d rather dial in the glycerin but being that materials are expensive, I’d rather know what the minimum is. Thanks.
Hi Ron! A loose starting rule of thumb is to use the same amount of glycerin as the same amount of oils. (i.e. If your recipe has 10 oz oil, try 10 oz glycerin as a solvent.)
However, I’ve seen suggestions for using even higher amounts of solvents.
Every recipe is going to have its own quirks, so it’s going to have to take some experimentation to see how low you can go with the amount.
You may also want to explore a blend of solvents such as sugar syrup, alcohol with the glycerin.
I personally like the glycerin + arrowroot combo, so haven’t really experimented past that. I agree with you – the material cost really adds up!
I have been making soap milk soap for years. In November of this year the building I made my soaps in burned to the ground. Along with all my supplies also went my receipt. I know the ingredients that I put into it but can’t remember the amounts. I’m hoping by reaching out someone might have a clue. I could just kick myself for not having it in my computer in the house.
Hi Heidi! I’m so sorry to hear about the fire – how heartbreaking!
I’m not sure how to find a lost recipe other than to try making some small test batches with what you can remember and estimate amounts, and see if you can eventually recreate your original soap.
Hugs! <3
I would like to stick with the store bought melt/pour but I want to add castor oil, Rosemary and Peppermint essential oil in order to make SHAMPOO BARS. Do you have a recipe for that? The recipes here on your page are too complicated for me and the material costs are too much for this senior on a very fixed income. So I would like to just stick with commercial melt/pours. Thank you in advance for a recipe that might work for me!
Hi Cherie! Your best bet is to buy a melt and pour base that’s designed for use as shampoo bars.
You can only add a tiny bit of oil to melt and pour soap base or you dampen all of the lather, so it won’t work the same way just to add castor oil to a base.
Wholesale Supplies Plus has a shampoo base:
https://www.wholesalesuppliesplus.com/soap-making-supplies/melt-pour-soap-base/shave-shampoo.aspx
and Stephenson has one too:
https://www.soapgoods.com/stephenson-solid-shampoo.html
Once you have your shampoo base, you can add rosemary and peppermint essential oils and make some lovely shampoo bars! :)